


♥ Follow Me ♥

♥Free Fonts♥


SUPPLIES NEEDED
TUBE OF CHOICE:
I used the fab artwork of Keith Garvey.
You must purchase a license to use his art.
You can find Keith's art and get your license HERE.
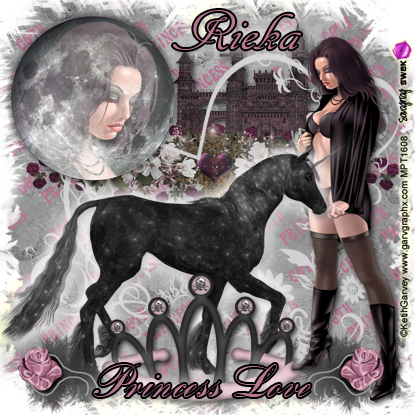
SCRAPKIT: Goth Princess by Rieka Rafita.
This is a PTU kit. You can find it HERE.
FONT OF CHOICE: I used BankScrD for “Princess Love”.
Cancellaresca ES for the name.
I used Photoshop for this tut.
♥♥♥♥♥♥♥
Here we go!
Open a canvas, transparent background, 600x600 pixels.
Open RR_Paper9.
Resize to fit your canvas.
Open RR_Moon.
Resize and place in the upper left corner.
Open RR_Unicorn.
Flip horizontally.
Position this in the middle of your siggy.
Now open your tube.
Place your tube to the right of the unicorn.
For this next step, I used a close up of my tube.
Open the tube and place it on top of the moon.
Center it where you'd like.
Now highlight the moon layer.
Grab your magic wand and click holding down the Shift key
until the entire moon is surrounded by marching ants.
Highlight your close up tube.
Go to Select.
Click Inverse.
Hit your Delete key on your keyboard.
Go back to Select and hit Deselect.
Now with your close up tube still highlighted,
right click it.
Click on Blending Options.
Now find Luminosity.
Click on that.
It should be set on 100% Opacity, Blend Mode Normal.
Hit OK.
These are the elements I used behind the moon layer:
RR_Castle
RR_Flower1
RR_Frames3
With the frame, I rotated it then went to Images.
Click Hue/Saturation in the drop down menu.
Find the slider saying Lightness.
Move the slider to +82.
The next two elements are placed on top of the unicorn.
Open RR_RoseFeather.
Resize and position it in the bottom left corner.
Duplicate this and flip it horizontally.
Place this layer in the bottom right corner.
Open RR_Crown.
Resize and place in center at the bottom.
Place a drop shadow on your tube, the crown, and the castle.
Highlight your unicorn.
Place an Outerglow:
Luminosity – 75%
Technique: Softer
Spread – 3
Size - 32
Make a new layer on top of all layers.
Type Princess Love.
I got the color for the font from using the eye dropper on a rose.
Then put a Stroke on it: Black, Outside, 3.
Copy your layer style from the unicorn layer.
Paste that layer style on Princess Love.
Now type the name you want in the font you want.
I used BankScrD.
I used Stroke, Black, Outside, 3.
Size it to fit.
Now go to your paper layer.
Grab any random eraser.
Erase around the edges to give you the look you want.
MOST IMPORTANT!!
You must now do this:
Put the artist's name, website, and your license number
of the tube you used on the siggy!!
Add your name (ie: Designed by Your Name) behind this info.
Make sure this info is legible and clearly seen.
Save as PNG.
YOU'RE DONE!!
Hope you enjoyed this tut!
HUGS!
*This tut was created by me, Redneck Tuts by Savage.
Any resemblance to any other is purely coincidental.*
Artist: ©Keith Garvey www.garvgraphx.com MPT1608
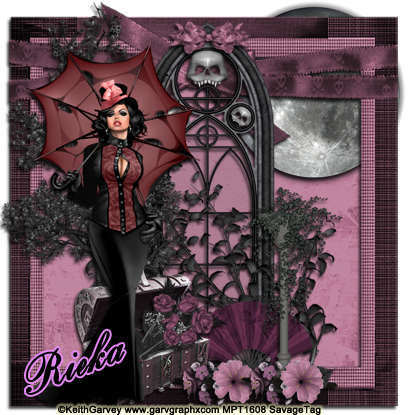
MOONLIT STROLL TUT
SUPPLIES NEEDED
TUBE OF CHOICE:
I used the fab artwork of Keith Garvey.
You must purchase a license to use his art.
You can find Keith's art and get your license HERE.
SCRAPKIT: Goth Princess by Rieka Rafita.
This is a PTU kit. You can find it HERE.
FONT OF CHOICE: I used BankScrD.
I used Photoshop for this tut.
♥♥♥♥♥♥♥
Let's Get Strollin'!
Open a canvas, transparent background, 600x600 pixels.
Open RR_Frames2.
Resize to fit your canvas with a small border around it.
Open RR_Paper8, place it under your frame.
Resize to fit just inside of Frames2.
Open RR_Moon.
Resize to fit and place it between your frame & paper.
These are the elements I used on top of the frame:
RR_Arch1
RR_Bow4
RR_Leaves2
RR_Tree
RR_Fans
RR_Leaves1
RR_Box
RR_Flower4
RR_Flower2
Resize all elements and position to fit as you like.
Now open your tube and place it on top of your siggy.
Place a drop shadow on all elements.
Make a new layer on top of all layers.
Type the name you want in the font you want.
I used BankScrD.
I used Stroke, e58af5, outside, 3.
Center, 3.
Size it to fit.
MOST IMPORTANT!!
You must now do this:
Put the artist's name, website, and your license number
of the tube you used on the siggy!!
Add your name (ie: Designed by Your Name) behind this info.
Make sure this info is legible and clearly seen.
Save as PNG.
YOU'RE DONE!!
Hope you enjoyed this tut!
HUGS!
*This tut was created by me, Redneck Tuts by Savage.
Any resemblance to any other is purely coincidental.*
Artist: ©Keith Garvey www.garvgraphx.com MPT1608
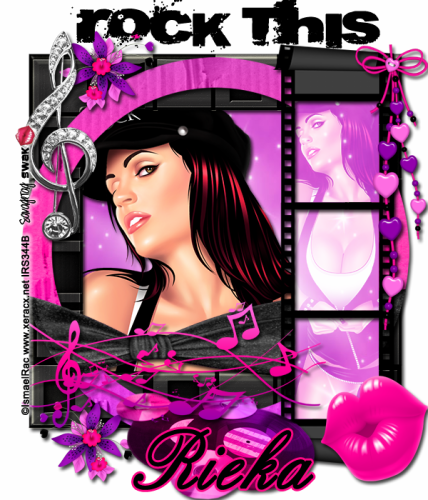
ROCK THIS TUT
SUPPLIES NEEDED
TUBE OF CHOICE: I used the fantastic artwork of Ismael Rac.
You must purchase a license to use his art.
You can find Ismael's art and get your license HERE.
SCRAPKIT: Rock Star by Rieka Rafita.
This is a PTU kit. You can find it HERE.
FONT OF CHOICE: I used:
a Bite – Rock This
English - name
I used Photoshop for this tut.
♥♥♥♥♥♥♥
Let's have some fun!
Open a canvas, transparent background, 650x650 pixels.
Open RR_Frames2. Center.
(Remember to leave room for wordart at the top.)
Open RR_Frames3. Center over Frames2.
Open RR_Paper6. Duplicate it.
Hide the copy layer.
Go to Frames2 layer and highlight it.
Take your magic wand tool and click inside Frames2.
You should see little marching ants.
Now go to Paper6. Highlight it.
**Go to Select at the top of our toolbar.
Click on Inverse in the drop down menu.
Now hit your Delete key on the keyboard.
Go back to Select and hit Deselect.**
(You will using the above steps more than once.
When you need to do this again, it will be marked **
Refer back here.)
Now you'll open RR_FoldedNegative.
Flip this 90 degrees clockwise.
Position it to the right side of your tag.
Now we'll go and unhide and highlight your copy of RR_Paper6.
Place it under Folded Negative.
Highlight Folded Negative.
♥Grab your magic wand and click inside the top frame of Folded Negative.
Holding the Shift key on your keyboard,
use the magic wand and click the middle frame of Folded Negative.
Holding the Shift key again,
click on the bottom frame of Folded Negative.
You should now see all three frames with marhing ants.♥
(You will be using these steps again.)
Highlight your copy of Paper6.
Repeat the steps marked **.
Now we'll place your tubes.
Open your tube. (I used a close up for this.)
Place it under Frames2.
Position it to your liking.
Highlight Frames2 layer.
Grab your magic wand and click on the inside of the frame.
Highlight your tube.
Repeat steps marked **.
Open your next tube.
Place it under Folded Negative.
Position to your liking.
Right click this layer.
You will see Blending Options in a drop down menu.
Click that.
Now find Screen and click it.
Click OK.
Highlight Folded Negative.
Repeat the steps marked ♥.
Highlight your tube layer.
Repeat steps marked **.
For the next part, you can use any elements you'd like.
I used:
RR_Flower3
RR_HeartString
RR_DiscAlbum
RR_MusicNote1
RR_MusicNote3
RR_Bow2
RR_Lips2
Place these on top of your siggy however you'd like.
Drop shadow all layers.
Make a new layer.
Use your font of choice and type ROCK THIS.
Position this at the top of your tag.
Using your font of choice, type the name on your siggy.
I used black for my fonts.
For the name, I used the eye dropper and got the color for the stroke (fc0786).
I used stroke 3, outside.
Crop and resize your siggy.
MOST IMPORTANT!!
You must now do this:
Put the artist's name, website, and your license number
of the tube you used on the siggy!!
Add your name (ie: Designed by Your Name) behind this info.
Make sure this info is legible and clearly seen.
Save as PNG.
YOU'RE DONE!!
I hope you had fun with this tut!
HUGS!
*This tut was created by me, Redneck Tuts by Savage.
Any resemblance to any other is purely coincidental.*
Artist: ©Ismael Rac www.xeracx.net IRS344B

ROCK STAR TUT
SUPPLIES NEEDED
TUBE OF CHOICE: I used the fabulous artwork of Tyson McAdoo.
You must purchase a license to use his art.
You can find Tyson's art and get your license HERE.
SCRAPKIT: Rock Star by Rieka Rafita.
This is a PTU kit. You can find it HERE.
FONT OF CHOICE: I used:
Cymbeline
I used Photoshop for this tut.
♥♥♥♥♥♥♥
Let's do this!
Open a canvas, transparent background, 650x650 pixels.
Open RR_Paper1.
Size it to fit your whole canvas.
Open RR_RayLight.
Move it up to the left corner of your tag.
Open RR_Sparkle2. Center.
These are the elements I used.
Feel free to use whichever ones you'd like.
RR_Amp
RR_Drum
RR_Microphone
RR_Button
RR_MusicNote7
RR_FluffyHeart
RR_Wordart11
RR_BraceletSkull
RR_DiscAlbum
RR_Headphones
Resize all elements to fit.
Position these however you please.
Open your tube of choice.
Place this on top of your elements.
Drop shadow all layers.
Make a new layer.
Now type your name.
I used color fe0497 with black stoke, 2, outside.
MOST IMPORTANT!!
You must now do this:
Put the artist's name, website, and your license number
of the tube you used on the siggy!!
Add your name (ie: Designed by Your Name) behind this info.
Make sure this info is legible and clearly seen.
Save as PNG.
YOU'RE DONE!!
I hope you had fun with this tut!
HUGS!
*This tut was created by me, Redneck Tuts by Savage.
Any resemblance to any other is purely coincidental.*
Artist: ©Tyson McAdoo www.tysonmcadoo.com MPT1608
About Me

- Savage
- Hi Ya'll! I'm Savage and I'd like to welcome you to Redneck Tuts. These are not your ordinary tuts, as they are geared toward those of us that don't have "working knowledge" of Photoshop or PSP. My tuts are all done in PS. They are designed to show you different techniques that you may not know. I hope you learn something that you can use in your creations in the future. Please, just have fun and put your own spin on these tuts. Be original and shine! Love Ya! ♥


