


♥ Follow Me ♥

♥Free Fonts♥


Saturday, January 19, 2013
SUPPLIES NEEDED
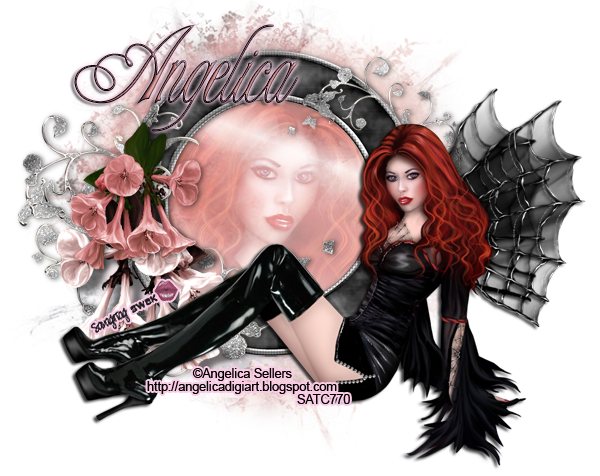
TUBE OF CHOICE: I used the beautiful artwork of
Angelica Sellers.
This tube is called Mystique.
You must have a license to use this art.
You can find this art and get your license HERE.
SCRAPKIT: Nightshade by Angelica Sellers.
You can find it HERE.
FONT OF CHOICE: I used Champagne.
I used Photoshop for this tut.
♥♥♥♥♥♥♥
This will be a quick tut using a pre-made cluster frame.
All we will be doing is placing a tube
and adding a name.
Angelica's cluster frame comes with many layers.
It also includes drop shadows.
So your work is already done for you!
You can rearrange the layers
or move them around to your liking.
For this tut,
I left everything as is.
Just play around and have FUN!
Open Nightshade kit.
Inside there,
you will find a folder called Cluster Frame.
Open that.
There is only one psd in there, clusterpsd.
Open it.
Open your tube.
Duplicate your tube layer.
Resize the duplicated tube to 50%.
Move the duplicated tube layer
on top of all cluster frame layers.
I flipped mine Horizontally.
Place a drop shadow on this layer.
Place the first tube layer you opened
between Raster 5 shadow one layer
and Raster 7 layer.
No drop shadow on this tube layer.
Now highlight Raster 5 shadow one layer.
Grab your Magic Wand.
Click inside the frame.
Highlight your tube layer.
Go up to Select in your tool bar at the top of your screen.
Click Inverse.
Hit the Delete key on your keyboard.
Go back to Select.
Click Deselect.
With your tube layer still highlighted,
Go to the upper left corner of your Layer Palette.
Click the down arrow next to the word Normal.
In the drop down menu,
Click Screen.
Leave the Opacity setting at 100%.
Now go over to the left of your screen and in the tool bar
find your Crop tool.
This will look like a weird square with a
diagonal line through it.
Crop your taggie to get rid of all the excess background.
Resize the siggy to your liking.
Make a new layer.
Type your name on the taggie.
I used color d78788.
Now place a Stroke:
Stroke, Inside, 1, Black
I also used:
Bevel & Emboss

I also used a Drop Shadow and Outer Glow.
Outer Glow, color fbd6ec

MOST IMPORTANT!!
You must now do this:
Put the artist's name, website, and your license number
of the tube you used on the siggy!!
Add your name (ie: Designed by Your Name) behind this info.
Make sure this info is legible and clearly seen.
Always Save as PSD first.
Then you can save it as a PNG.
YOU'RE DONE!
I hope you had fun with this tut
and that you can use the different techniques
in other taggies you create!
HUGS!
*This tut was created by me, Redneck Tuts by Savage.
Any resemblance to any other is purely coincidental.*
Artist: ©Angelica S. http://angelicadigiart.blogspot.com SATC770
Subscribe to:
Posts
(Atom)
About Me

- Savage
- Hi Ya'll! I'm Savage and I'd like to welcome you to Redneck Tuts. These are not your ordinary tuts, as they are geared toward those of us that don't have "working knowledge" of Photoshop or PSP. My tuts are all done in PS. They are designed to show you different techniques that you may not know. I hope you learn something that you can use in your creations in the future. Please, just have fun and put your own spin on these tuts. Be original and shine! Love Ya! ♥


