


♥ Follow Me ♥

♥Free Fonts♥


Thursday, December 5, 2013

Here's a multi-layered mask for any Awareness.
Saved in 2 layers as psd and jpeg.
One layer is heart and half-tone dots,
One layer is ribbons and the word Hope.
Just click the pic for download.
Thanks for stopping and
Have Fun!

HAPPY BIRTHDAY!
Here you have two masks in one.
You can use them as paper overlays too!
Multi-layered mask has 2 layers of wordart.
Saved as psd in layers and 2 jpegs.
Just click the pic for download.
Have Fun!

Did someone say CUPCAKES?
Here's a multi-layered mask for you.
Saved as psd in layers and 2 jpeg.
Have Fun!
Just click the pic for download.
Saturday, October 19, 2013

SUPPLIES NEEDED
TUBE OF CHOICE: I used the beautiful poser by
RenderEricaWilmaSensibility.
This tube is called Devilin.
I used all three poses in the tag.
You can find them HERE.
SCRAPKIT: Nosferatu by Scrapz N Stuff.
You can find it HERE.
FONT OF CHOICE: I used Cocaine Sans.
I used Photoshop for this tut.
♥♥♥♥♥♥♥
Open a canvas 800x800 pixels.
Transparent background.
Use my tag as a guide for placement of elements.
Open pp4, center on canvas.
Open pp6, center.
Go to the upper left corner of your Layer Palette.
Click on the down arrow next to the word Normal.
In the drop down menu, click Luminosity.
Leave the Opacity set at 100%.
Open pp2, center.
Go to the drop down menu again.
Click Overlay.
Opacity set at 100%.
Now hide all three pp layers.
We will come back to them later.
Open fr3 and center on canvas.
Open fr2, resize to 90%
Center this over fr3.
Open pp3, center on canvas.
In the Layer Palette,
place this right below fr2.
Highlight fr2 layer.
Hold down the Ctrl key on your keyboard.
Now click the fr2 icon in your Layer Palette.
You should see marching ants on your tag.
Let go of the Ctrl key.
Highlight your paper layer.
Look at the bottom of your Layer Palette.
You'll see a little square with a circle in it.
Click that.
Your paper layer now has two icons in it.
Hide your fr2 layer.
With pp3 layer highlighted,
Right click in the layer palette.
Click on Convert to Sharp Object.
Right click again.
Click on Raterize Layer.
Now you have a red frame.
I erased a portion of this frame at the top
to make it look like it was wrapped around fr3.
Open el 14.
Place this behind fr3 and center.
Now let's play with some elements.
Open and place these elements:
el 2, resize to 80%
el 16, resize to 25%
el 10, resize to 20%
el 9, resize to 20%, flip Horizontally
el 1, resize to 65%
el 4, reseize to 75%
el 5
Now open up the poser Devilin1.
Place to your liking.
Go to the upper right corner of the Layer Palette.
Where it says Opacity,
type in 65%
Hit Enter on your keyboard.
Grab a soft eraser.
Erase all of Devilin1 except her head and shoulders.
Now we'll add more elements.
Open and place:
el 6
el 20, resize to 20%
el 18, resize to 35%
el 15
el 23
Open poser Devilin2.
Place to your liking.
Set the Opacity to 65%.
Erase her wings and legs.
Open poser Devilin3.
Resize her to 45%
Position her where you like.
Open and place:
el 7
el 8, resize to 65%
Now we'll finish up our paper layers.
Unhide all three paper layers.
Grab a soft edged eraser.
Erase around the paper edges
to prevent any harsh lines on your finished siggy.
This also give it a cloudy look.
Do this for all three papers.
Add a Drop Shadow to all layers
except the paper layers.
Resize the siggy to your liking.
Make a new layer.
Type your name on the taggie.
I used color 871320
Now place a Stroke:
Stroke, Outside, 2, Black
I also used a Drop Shadow.
MOST IMPORTANT!!
You must now do this:
Put the artist's name, website, and your license number
of the tube you used on the siggy!!
Add your name (ie: Designed by Your Name) behind this info.
Make sure this info is legible and clearly seen.
Always Save as PSD first.
Then you can save it as a PNG.
YOU'RE DONE!
I hope you had fun with this tut
and that you can use the different techniques
in other taggies you create!
HUGS!
*This tut was created by me, Redneck Tuts by Savage.
Any resemblance to any other is purely coincidental.*
Artist: ©RenderEricaWilmaSensibility
CT-SPU-Savage
Wednesday, June 26, 2013
I made this template for the Alopecia Areata Blog Train.
You can snag it HERE.

*Black Champange & Diamonds is my old designer name.
I know go by The Coffee Slut.*
Sunday, April 14, 2013
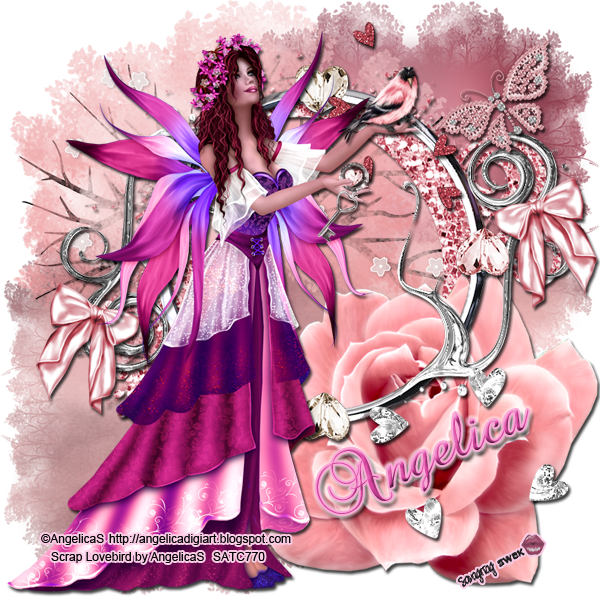
SUPPLIES NEEDED
TUBE OF CHOICE: I used the beautiful artwork of
Angelica Sellers.
This tube is called Florabel.
You must have a license to use this art.
You can find this art and get your license HERE.
SCRAPKIT: Lovebird by Angelica Sellers.
You can find it HERE.
FONT OF CHOICE: I used BrockScript.
I used Photoshop for this tut.
♥♥♥♥♥♥♥
Open a canvas 800x800 pixels.
Transparent background.
Use my tag as a guide for placement of elements.
In the Paper folder,
open paperjpg10.
Center on canvas.
In the Mask folder,
open mask01 photoshop.
I placed this in the lower left corner.
Duplicate this layer.
Move the second layer to
the upper right corner of your canvas.
With this layer highlighted,
Right click in the Layer Palette.
In the menu that appears
Click Merge Down.
You should now have only one mask layer.
With the mask layer highlighted,
Hold down the Ctrl key on your keyboard.
Now click the mask icon in your Layer Palette.
You should see marching ants on your tag.
Let go of the Ctrl key.
Highlight your paper layer.
Look at the bottom of your Layer Palette.
You'll see a little square with a circle in it.
Click that.
You paper layer now has two icons in it.
Hide your black mask layer.
And there's your mask!
With your new mask layer highlighted,
Right click in the Layer Palette.
Click on Convert to Smart Object.
Right click again.
Click on Raterize Layer.
Your mask is done.
You can delete the black mask layer if you wish.
These are the elements I used.
Use my tag as a guide for placement.
element02
element21
element 51
element20
element41, resize to 35%
Flip this layer Horizontally
element28, resize to 35%
element25, resize to 50%
element24, resize to 40%
element11, resize to 25%
Duplicate this layer.
Hide the second layer.
element01, resize to 25%
Open your tube.
I used fairy02, resized to 25%.
Position this layer below element01
and both element11 layers
in the Layer Palette.
To make it look like your tube is holding the key:
Highlight the duplicated element11 layer.
Grab a small eraser.
Erase where her thumb is only.
Now move the duplicated element11 layer
above your tube in the Layer Palette.
Viola! She's holding the key!
Keep both element11 layers visible.
There will not be a drop shadow on the duplicated layer,
but will be on the original one.
This prevents over shadowing on the key.
Place a drop shadow on all your layers except:
paper mask layer
element02
element11, duplicated layer
Resize the siggy to your liking.
Make a new layer.
Type your name on the taggie.
I used color db46a2
Now place a Stroke:
Stroke, Outside, 2, color fba8d7
I also used:
Bevel & Emboss
_html_m7ac11385.jpg)
I also used a Drop Shadow and Outer Glow.
Drop Shadow
_html_1afcd844.jpg)
Outer Glow
_html_m6e89e649.jpg)
MOST IMPORTANT!!
You must now do this:
Put the artist's name, website, and your license number
of the tube you used on the siggy!!
Add your name (ie: Designed by Your Name) behind this info.
Make sure this info is legible and clearly seen.
Always Save as PSD first.
Then you can save it as a PNG.
YOU'RE DONE!
I hope you had fun with this tut
and that you can use the different techniques
in other taggies you create!
HUGS!
*This tut was created by me, Redneck Tuts by Savage.
Any resemblance to any other is purely coincidental.*
Artist: ©Angelica S. http://angelicadigiart.blogspot.com SATC770
Wednesday, April 10, 2013

SUPPLIES NEEDED
TUBE OF CHOICE: I used the beautiful artwork of
Angelica Sellers.
This tube is called Kitty.
You must have a license to use this art.
You can find this art and get your license HERE.
SCRAPKIT: Sexy City Kitty by Angelica Sellers.
You can find it HERE.
FONT OF CHOICE: I used Bickham Script Two.
I used Photoshop for this tut.
♥♥♥♥♥♥♥
Open a canvas 800x800 pixels.
Transparent background.
Use my tag as a guide for placement of elements.
Open paper11.
Center on canvas.
Grab a soft edged eraser.
Erase just around the edges.
Open Kitty03 tube.
Place this on the right side of your tag.
Use my tag as a guide.
Duplicate this layer and
resize the duplicate to 50%.
Move the duplicated tube over to
the left of the canvas and hide it for now.
We'll come back to the duplicated tube.
Open element01.
Place over to the left side of canvas.
Rotate a bit.
Open element16.
This goes over to the right of the canvas.
Open element17.
Center on top of element16.
Open paper17.
Resize to 50%.
Place this layer directly
beneath element16 in your Layer Palette.
Center this inside frame.
Open element29.
Place to your liking inside the frames.
Erase any part that extends outside the frames.
Open element51.
Center in frames.
Erase any part of this layer
that extends outside the frames.
Ok, now we're going to work with your first tube layer.
Position the tube so you can see only her eyes
above the frames.
Grab a soft edged eraser.
Erase all of the tube except around her eyes.
Use my tag as a guide.
In the upper right corner of your Layer Palette
Set the Opacity to 65%.
Leave the word Normal set as is.
Duplicate this tube layer.
Go to the upper left corner of your Layer Palette.
Click the down arrow next to the word Normal.
In the menu that pops up,
Click Screen.
Leave Opacity at 100%.
Place these elements:
element15
element19
element30
element08, resize to 35%
Flip this layer Horizontally.
Unhide the tube layer that you resized to 50%.
Move this tube above elemento8 layer.
Now position where you like.
These are the elements I used
to finish the siggy:
element24, resize to 35%
element31, resize to 35%
Duplicate this layer.
Flip duplicated layer Horizontally.
Element28, resize to 35%
Flip this layer Vertically.
element14, resize to 50%
element38, resize to 35%
element22, resize to 35%
element36, resize to 35%
element39, resize to 35%
element43, resize to 35%
element41
element45, resize to 35%
element48, resize to 35%
Flip this layer Horizontally.
Duplicate this layer.
element35, resize to 35%
element49, resize to 35%
Flip this layer Horizontally.
Duplicate this layer.
element02, resize to 90%
Place a drop shadow on all
your elements except:
paper11
full size tube layers
paper17
Resize the siggy to your liking.
Make a new layer.
Type your name on the taggie.
I used color edcdd0
Now place a Stroke:
Stroke, Center, 2, color cc6fa1
I also used:
Bevel & Emboss
_html_m2f1bc017.jpg)
I also used a Drop Shadow.
MOST IMPORTANT!!
You must now do this:
Put the artist's name, website, and your license number
of the tube you used on the siggy!!
Add your name (ie: Designed by Your Name) behind this info.
Make sure this info is legible and clearly seen.
Always Save as PSD first.
Then you can save it as a PNG.
YOU'RE DONE!
I hope you had fun with this tut
and that you can use the different techniques
in other taggies you create!
HUGS!
*This tut was created by me, Redneck Tuts by Savage.
Any resemblance to any other is purely coincidental.*
Artist: ©Angelica S. http://angelicadigiart.blogspot.com SATC770
Subscribe to:
Posts
(Atom)
About Me

- Savage
- Hi Ya'll! I'm Savage and I'd like to welcome you to Redneck Tuts. These are not your ordinary tuts, as they are geared toward those of us that don't have "working knowledge" of Photoshop or PSP. My tuts are all done in PS. They are designed to show you different techniques that you may not know. I hope you learn something that you can use in your creations in the future. Please, just have fun and put your own spin on these tuts. Be original and shine! Love Ya! ♥


