


♥ Follow Me ♥

♥Free Fonts♥


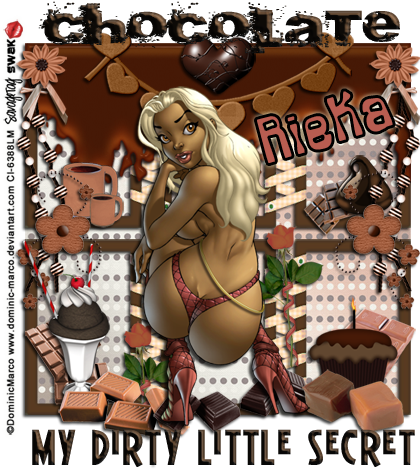
SUPPLIES NEEDED
TUBE OF CHOICE: I used the fantastic artwork of Dominic Marco.
You must purchase a license to use his art.
You can find Dominic's art and get your license HERE.
SCRAPKIT: yChocolate Lovers by Rieka Rafita.
This is a PTU kit. You can find it HERE.
FONT OF CHOICE: I used:
a Bite – chocolate
BattleLines – my dirty little secret
Backlash (BRK) - name
I used Photoshop for this tut.
♥♥♥♥♥♥♥
Let's have some fun!
Open a canvas, transparent background, 650x650 pixels.
Open RR_Frames1. Center at top of canvas.
(Remember to leave room for wordart.)
Duplicate and place below the upper Frames1.
Open RR_Paper8. Set Opacity at 50.
Resize to fit inside both Frames1.
Now for the fun!
Let's go nuts...
I placed these elements at the top of the upper frame:
RR_MeltChocolate2
RR_HeartGarland
RR_Chocolate6
RR_Beadstring
RR_Flower4
RR_Bow1
For the rest of the siggy, I used:
RR_ChocolateCups
RR_HersheyKisses4
RR_Shake
RR_Cupcake
RR_Candy1
RR_Chocolate6
RR_Chocolate8
RR_Chocolate12
RR_Chocolate15
RR_Chocolate19
RR_Chocolate20
RR_Flower2
RR_Flower5
I flipped Flower5 90 Clockwise and duplicated it.
Resize all elements to fit as you like.
Open your tube of choice and place in center of siggy.
Place a drop shadow on each element on top of the frame.
Make a new layer on top of all layers.
Type the name you want in the font you want.
I used the eye dropper tool and chose a color from my tube's shoe.
Make another new layer.
Type “Chocolate” and place at the top of your sig.
Make one more new layer.
Type “My Dirty Little Secret”
Place at the bottom of your siggy.
MOST IMPORTANT!!
You must now do this:
Put the artist's name, website, and your license number
of the tube you used on the siggy!!
Add your name (ie: Designed by Your Name) behind this info.
Make sure this info is legible and clearly seen.
Save as PNG.
YOU'RE DONE!!
I hope you had fun with this tut!
HUGS!
*This tut was created by me, Redneck Tuts by Savage.
Any resemblance to any other is purely coincidental.*
Artist: ©Dominic Marco www.dominic-marco.deviantart.com CI-6388LM
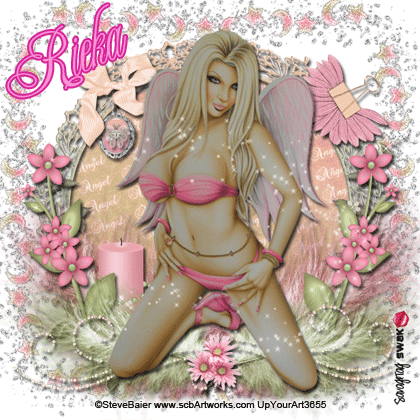
SUPPLIES NEEDED
TUBE OF CHOICE: I used the beautiful artwork of Steve Baier.
You must purchase a license to use his art.
You can find his art and get your license HERE.
SCRAPKIT: My Angel by Rieka Rafita.
This is a PTU kit. You can find it HERE.
FILTER: dsb flux
FONT OF CHOICE: I used Champange.
I used Photoshop for this tut.
♥♥♥♥♥♥♥
In this tut we'll be doing some sparklies.
If you don't wish to animate, just skip the steps marked ** in BLUE**.
Open a canvas, white background, 650x650 pixels.
Open RR_Frames4. Center it on white background.
Open RR_Paper16. Rotate it just a bit.
Click on Frames4 layer.
Now grab your magic wand tool and click on the inside of your frame.
Click on Paper16 layer.
Go to Select, click Inverse.
Hit the Delete button on your keyboard.
Go back to Select, click on Deselect.
These are the elements I used on top of the frame:
RR_FloralVine
RR_Feather1
RR_Feather2
RR_Flower1
RR_Flower2
RR_Candle
RR_Pearls
RR_Charm
RR_Butterfly3
RR_Bow5
RR_Borderclip
Resize the elements to fit and place wherever you wish.
I duplicated the layers:
RR_FloralVine
RR_Feather1
RR_Feather2
RR_Flower1
RR_Pearls
After duplicating these, I flipped them horizontally.
After placing your charm where you'd like,
resize the Butterfly to fit inside the charm.
Place your tube on top of everything.
Resize to fit.
Go ahead and put your dropshadow on all layers.
We will build a border now.
Open RR_Glittertrail.
Place this at the top of your siggy.
Duplicate this layer and place it at the bottom.
Duplicate.
Flip this third layer of Glittertrail 90 Counter Clockwise.
Place on the left edge of your siggy.
Duplicate.
Flip your fourth layer horizontally.
Place on the right edge of your siggy.
Now merge duplicated layers of Glittertrail down
so you have one layer that forms the border.
Place the border layer behind Frame4.
Open RR_Sparkle1 and RR_Sparkle3.
Place these on top of your siggy.
Make a new layer on top of all layers.
Type the name you want in the font you want.
I used Champange.
I colored the font bright pink, f991d1.
I also used Stroke, a deep pink: d42498, 2, Outside.
Size it to fit and position where you like.
MOST IMPORTANT!!
You must now do this:
Put the artist's name, website, and your license number
of the tube you used on the siggy!!
Add your name (ie: Designed by Your Name) behind this info.
Make sure this info is legible and clearly seen.
Resize your sig to your liking.
If you do not wish to animate
Use only one Sparkle element.
Save as PNG.
You're Done!
**FOR ANIMATION:**
Duplicate the Glittertrail border once.
Click on the first layer of your border.
Apply dsb flux filter, 30 mix.
Click on the second layer of the border.
Apple dsb flux, 31, mix.
Hide the second layer of your border.
Hide the Sparkle3.
Open your animation window.
Duplicate the first frame.
You will only have two frames of animation.
Hide Sparkle1 and the first layer of the border.
Set animation time at .2 seconds.
Hit Play.
If everything is to your liking
Save as PSD. Then Save for Web & Devises.
YOU'RE DONE!
I hope you enjoyed this tut!
HUGS!
*This tut was created by me, Redneck Tuts by Savage.
Any resemblance to any other is purely coincidental.*
Artist: ©Steve Baier www.scbArtworks.com UpYourArt3655

SUPPLIES NEEDED
TUBE OF CHOICE: I used the fantastic artwork of Elias Chatzoudis.
You must purchase a license to use his art.
You can find Elias's art and get your license HERE.
SCRAPKIT: Summerlious by Rieka Rafita.
This is a PTU kit. You can find it HERE.
FONT OF CHOICE: I used Cheri for the name, Chikita for Summerlious Fun.
I used Photoshop for this tut.
♥♥♥♥♥♥♥
In this tut we'll be animating the sun and sparklies.
If you don't wish to animate, just skip the steps marked with ** in BLUE**.
Open a canvas, white background, 650x650 pixels.
Open RR_Paper12. Center it on white background.
Go to your tool bar and grab an eraser with a soft edge.
Randomly erase the edges of Paper12 to give it a soft look.
Open element RR_Sea.
Center this on top of Paper12.
Open RR_Pool.
Center.
Open RR_PalmTree.
Place the tree behind the pool and position as you like.
Resize to fit.
Now place your tube of choice on top of the pool.
To make it look as though she is in the water,
Erase from her hips down to about her knees.
I used a soft edged eraser.
These are the elements I used on top of the Pool:
RR_Octupus
RR_IceCream6
(I flipped the IceCream horizontally and placed it behind the Octupus.)
RR_Fish
(Erase the bottom fin to make it look as though the fish is in the water.)
In front of the Pool, I used:
RR_CoconutDrink
RR_Starfish1
RR_Starfish2
RR_Crab
RR_Lollipop4
(I placed the Lollipop behind the Crab.)
RR_Seashell1
RR_Seashell2
Open RR_Sun and position it where you like.
**FOR ANIMATION:**
Duplicate the Sun twice.
You should now have three layers of the Sun.
We'll be placing an Outerglow on all layers of the Sun.
I chose a pale creamy yellow, fffbe, for color.
On the first layer, Spread 4, Size 9.
Second layer, Spread 8, Size 13.
Third layer, Spread 12, Size 17.
Now for the sparklies.
(If you don't wish to animate, use only one Sparkle element.)
**FOR ANIMATION**
Open RR_Sparkle1 and RR_Sparkle2.
These should be the top two layers of your siggy/tag.
Now's the time to put a drop shadow on the elements you've used.
I did not put a drop shadow on the Sun layers, Sea, Sparkles or Paper.
Make a new layer on top of all layers.
Type the name you want in the font you want.
I used Cheri.
I colored the font teal, 40caf7.
I also used Stroke, Black, 3, Center.
Size it to fit and position where you like.
For Summerlicious Fun I used the font Chikita.
I used the same effects on this layer.
MOST IMPORTANT!!
You must now do this:
Put the artist's name, website, and your license number
of the tube you used on the siggy!!
Add your name (ie: Designed by Your Name) behind this info.
Make sure this info is legible and clearly seen.
If you don't want to animate, Save as PNG.
YOU'RE DONE!!
**TO ANIMATE:**
Open the Animation Window.
You will need four frames.
Set the time for .02.
For the first frame:
Show only the first layer of the Sun and Sparkle1.
Second frame:
Show only the second layer of the Sun and Sparkle2.
Third frame:
Show only the third layer of the Sun and Sparkle1.
Fourth frame:
Show only the second layer of the Sun and Sparkle2.
Save as PSD. Then Save for Web & Devises.
If you didn't animate, Save as PNG.
YOU'RE DONE!
I hope you had fun with this tut!
HUGS!
*This tut was created by me, Redneck Tuts by Savage.
Any resemblance to any other is purely coincidental.*
Artist: ©Elias Chatzoudis www.elias-designs.gr MPT1608
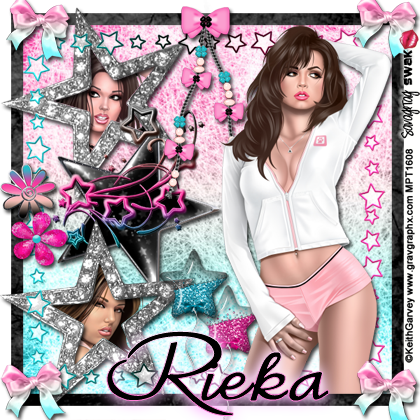
SUPPLIES NEEDED
TUBE OF CHOICE: You will need three tubes of the same artist.
I used the fab artwork of Keith Garvey.
You must purchase a license to use his art.
You can find Keith's art and get your license HERE.
SCRAPKIT: Starlicious by Rieka Rafita.
This is a PTU kit. You can find it HERE.
FONT OF CHOICE: I used Azariel Demo.
I used Photoshop for this tut.
♥♥♥♥♥♥♥
Let's Have Some Fun!
Open a canvas, transparent background, 600x600 pixels.
Open RR_Paper 7, resize to 80x80.
Open RR_Paper9, resize to 75x75.
Place on top of Paper 7.
Open RR_Frame2, resize to 80x80.
Center over Paper9.
These are the elements I used behind the frame:
RR_Star1
RR_Star6
RR_Star3
RR_Balloon1
RR_Balloon2
On top of the frame, I used:
RR_Beaded Rope
RR_Bow1
RR_Flower1
RR_Flower3
Resize all elements and position to fit as you like.
Place a drop shadow on all elements except RR_Star3.
Ok, now we'll insert the tubes of your choice inside RR_Star1.
Open your first tube and place it directly under your top Star1.
Position and resize it to your liking.
Make sure the face is centered inside the Star1.
Click on that Star layer.
Now go up and click on the Magic Wand tool.
Place your magic wand inside the Star.
Click.
You should see little marching “ants” now.
Go to your tube layer and click it.
Got up to your tool bar and click Select.
A drop down menu appears.
Click Inverse.
Hit the Delete button on your keyboard.
You should see the tube inside the star now.
Go back to Select.
Click Deselect.
Repeat these steps for your second tube and Star.
Open your third tube and place it on top of your frame.
Apply a drop shadow.
Make a new layer on top of all layers.
Type the name you want in the font you want.
I used Azariel Demo.
I also used Stroke, gradiant overlay, Pink1 Gloss
Center, 3.
I then applied an Outer Glow of light pink
Spread 8, Size 24.
Size it to fit.
MOST IMPORTANT!!
You must now do this:
Put the artist's name, website, and your license number
of the tube you used on the siggy!!
Add your name (ie: Designed by Your Name) behind this info.
Make sure this info is legible and clearly seen.
Save as PNG.
YOU'RE DONE!!
Hope you enjoyed this tut!
HUGS!
*This tut was created by me, Redneck Tuts by Savage.
Any resemblance to any other is purely coincidental.*
Artist: ©Keith Garvey www.garvgraphx.com MPT1608
About Me

- Savage
- Hi Ya'll! I'm Savage and I'd like to welcome you to Redneck Tuts. These are not your ordinary tuts, as they are geared toward those of us that don't have "working knowledge" of Photoshop or PSP. My tuts are all done in PS. They are designed to show you different techniques that you may not know. I hope you learn something that you can use in your creations in the future. Please, just have fun and put your own spin on these tuts. Be original and shine! Love Ya! ♥


