





♥ Follow Me ♥

♥Free Fonts♥


Showing posts with label FTU TUTS. Show all posts
Showing posts with label FTU TUTS. Show all posts
Monday, March 12, 2012
SUPPLIES NEEDED
TUBE OF CHOICE: I used the sweet and sexy artwork of
Sweet Pinup.
You must have a license to use this art.
You can find this tube and get a license HERE.
SCRAPKIT: Sweet Emotion by Diry Art Designs.
This is a Free To Use kit!
You can find it HERE.
FONT OF CHOICE: I used LaurenScript.
I used Photoshop for this tut.
♥♥♥♥♥♥♥
Let's have some fun!
Open a new canvas, 700x700.
Transparent background.
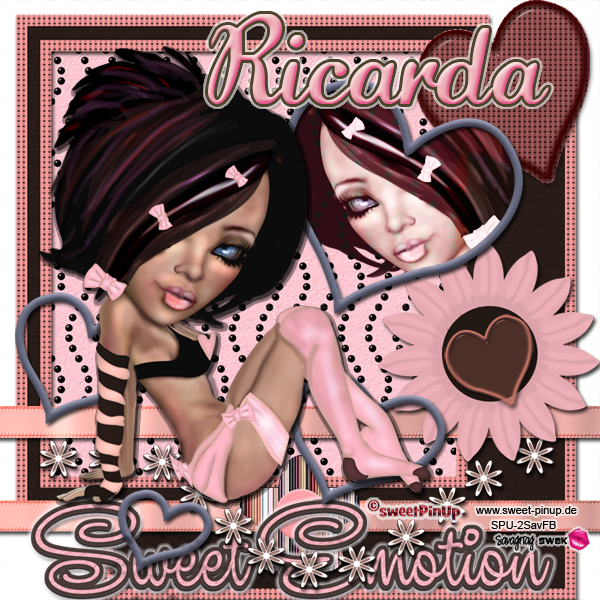
Use my taggie as a guide for placement of elements.
Open imagen117.
Resize to 20%
Open imagen84.
Resize to 90%
Highlight imagen117.
Move this so it's centered inside 84.
Highlight 84 layer.
Grab you Magic Wand.
Click inside the frame.
Highlight 117 layer.
Go to Select in your tool bar.
Click Inverse.
Hit the Delete key on your keyboard.
Go back to Select.
Click Deselect.
I used these elements (imagens):
121
115
86, resize to 45%
92, resize to 50%
80, resize to 20%
125, resize to 20%
Highlight 80 layer.
Place so layer 125 is covering it.
Highlight 125 layer.
Grab your Magic Wand.
Click on the heart.
Highlight layer 80.
Go to Select.
Click Inverse.
Hit the Delete key on your keyboard.
Go back to Select.
Click Deselect.
Continue with these elements:
43, resize to 50%
122, resize to 10%
119, resize to 65%
Open your tube.
I resized my tube to 35%.
Place to your liking.
Now duplicate your tube layer.
Flip it Horizontally.
Move this tube layer behind 119 layer.
Center your tubes face inside
the upper right heart of layer 119.
When you have it where you like,
Highlight layer 119.
Click inside the heart where your tubes face is.
Highlight your duplicated tube layer.
Go to Select in your tool bar.
Click Inverse.
Hit the Delete key on your keyboard.
Go back to Select.
Click Deselect.
With this tube layer still highlighted,
Go to the upper left corner of your Layer Palette.
Click the down arrow next to the word Normal.
Click Luminosity.
Leave Opacity set at 100%.
Duplicate this layer.
With the new layer highlighted,
Go back to the down arrow.
Click it.
This time click Screen.
Place a drop shadow on all layers except:
duplicated tube layers
layer 80
layer 117
I also put an Outer Glow on layer 86.
Resize your taggie to your liking.
Make a new layer for your name.
I used color eeafb7.
Stroke, Outside, 3, color 4e442d
Outer Glow
Drop Shadow
Bevel & Emboss
_html_76d27cdd.png)
MOST IMPORTANT!!
You must now do this:
Put the artist's name, website, and your license number
of the tube you used on the siggy!!
Add your name (ie: Designed by Your Name) behind this info.
Make sure this info is legible and clearly seen.
Save as PSD to maintain layers.
Then save as PNG, remembering to use a number behind your sig title.
YOU'RE DONE!!
I hope you had fun with this tut!
♥HUGS!♥
*This tut was created by me, Redneck Tuts by Savage.
Any resemblance to any other is purely coincidental.*
Artist: ©Sweet Pinup www.sweet-pinup.de SPU-22SavFB
Wednesday, February 29, 2012
SUPPLIES NEEDED
TUBE OF CHOICE: I used the awesome artwork of
Jose Cano.
The tube I used came with 2 Close Ups.
When I mad this tut, Jose was selling at a different store.
That store has now closed.
When I mad this tut, Jose was selling at a different store.
That store has now closed.
SCRAPKIT: Revenge by Jenny's Designz.
You can find it HERE.
MASK: Mask3 by Savage SWAK.
You can snag it HERE.
FONT OF CHOICE: I used ConsulScriptSSK.
I used Photoshop for this tut.
♥♥♥♥♥♥♥
Let's have some fun!
Open a new canvas, 700x700.
Transparent background.
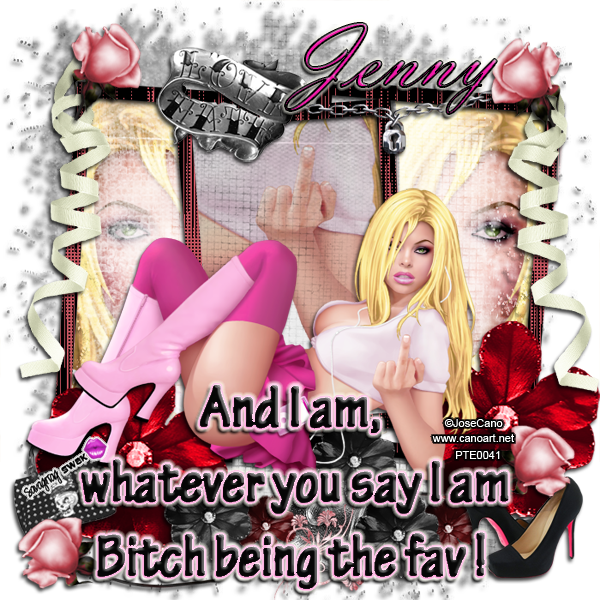
Use my taggie as a guide for placement of elements.
Open paper5.
Resize to fit your canvas.
Center on canvas.
Open Mask3.
You'll see three layers in Mask1.
Only move the layer called Mask
onto your siggy.
Place this on top of your paper.
With this layer highlighted
hold your CTRL key down on your keyboard
and hit your mask icon in the layer palette
at the same time.
You'll see little marching ants now.
Highlight your paper layer.
Click the mask button
(this is a square with a circle in it)
at the bottom of the layer palette.
*You should have two pictures in your paper layer now.
One of your paper and one of the mask.*
Hide your mask layer.
Highlight the paper layer.
Right click in the layer palette.
Hit Convert to Smart Object.
Right click again.
Click Rasterize Layer.
Now you can delete the gray mask layer.
Resize your new mask to your liking.
Open frame6.
Center on canvas.
Open your largest Close Up tube.
Move your CU tube under frame6
but on top of mask.
Duplicate this layer.
Flip the duplicate Horizontally.
Place these tube layers inside
the left and right parts of frame6.
When you have them as you like,
Highlight frame6 layer.
Grab your Magic Wand.
Click inside the left frame.
Now highlight that tube layer.
Go to Select in the tool bar.
Click Inverse.
Hit the Delete key on your keyboard.
Go back to Select.
Choose Deselect.
Go to the upper left corner of your Layer Palette.
Click the drop down arrow next to the word Normal.
Choose Overlay.
Leave the Opacity set to 100%.
Highlight your frame layer again.
With your Magic Wand,
Click inside the right frame.
Highlight that tube layer.
Go to Select.
Inverse.
Hit Delete on the keyboard.
Back to Select.
Click Deselect.
Go to the drop down arrow again.
Click Overlay.
Opacity 100%.
Open the next sized Close Up tube.
This should be right under frame6 layer
but on top of the tube layers you just worked with.
Place this layer inside the center frame to your liking.
Highlight frame6 layer.
Grab your magic wand.
Click inside the center frame.
Highlight that tube layer.
Go to the toolbar at the top of your screen.
Click Select.
In the drop down menu,
Choose Inverse.
Now hit the Delete key on your keyboard.
Go back to Select.
Click Deselect.
With your tube layer still highlighted,
Go to the drop down arrow again
in the upper left corner of the Layer Palette.
Click the arrow.
Select Multiply.
Leave Opacity set at 100%.
On to the elements.
These are the ones I used.
Use my tag as a guide for placement.
chain1, resize to 35%
banner, resize to 65%
flower5, resize to 80%
Flip Vertically
Duplicate this layer.
braclet, resize to 75%
flower4, resize to 45%
Duplicate this layer.
doodle, resize to 20%
flower1, resize to 35%
Duplicate this layer twice.
shoes, resize to 35%
bag, resize to 35%
ribbon, resize to 65%
Duplicate this layer
Flip Horizontally.
rose, resize to 25%
Duplicate this layer three times.
Rotate each layer to fit where you like.
I erased the stems off the ones
at the top of the frame.
Open your regular sized tube
and place to your liking.
Open wordart1.
Resize to 75%.
I used these effects on this:
Color Overlay, Black
Stroke, Center, 2, color fec5e8
Bevel & Emboss
_html_3cb1ddd9.jpg)
Outer Glow

Drop Shadow

Place a drop shadow on your layers.
I did not place a drop shadow on:
the Close Up tube layers.
Resize your taggie to your liking.
Make a new layer.
Type your name.
I used color f319a9.
Stroke: Center, 2, Black
I also used the same settings as above for:
Bevel & Emboss
Outer Glow
Drop Shadow
MOST IMPORTANT!!
You must now do this:
Put the artist's name, website, and your license number
of the tube you used on the siggy!!
Add your name (ie: Designed by Your Name) behind this info.
Make sure this info is legible and clearly seen.
Save as PSD to maintain layers.
Then save as PNG, remembering to use a number behind your sig title.
YOU'RE DONE!!
I hope you had fun with this tut!
♥HUGS!♥
*This tut was created by me, Redneck Tuts by Savage.
Any resemblance to any other is purely coincidental.*
Artist: ©Jose Cano www.canoart.net PTE0041
Saturday, October 15, 2011

SUPPLIES NEEDED
TUBE OF CHOICE: I used the fantastic artwork of
Michi Art.
When I made this tut, she was selling in another store.
That store has closed.
When I made this tut, she was selling in another store.
That store has closed.
You can now find this art and get your license HERE.
SCRAPKIT: Spookilicious by Black Widow Creationz.
This is an Exclusive Freebie.
Just visit Black Widow's Facebook
and Like her.
Go Grab Her Freebie!
You can find it HERE.
MASK: Mask1 by Savage SWAK.
You can snag it HERE.
FONT OF CHOICE: I used The Buns.
I used Photoshop for this tut.
♥♥♥♥♥♥♥
In this tut we'll make 2 layers move.
If you don't wish to animate, just skip the steps marked *BLUE*
Use my tag as a guide for placement of elements.
Open a canvas 700x700 pixels.
Flood fill with the color of your choice.
Open PP10.
Center on canvas.
Open Mask1.
You'll see three layers in Mask1.
Only move the layer called Mask
onto your siggy.
Place this on top of your paper.
With this layer highlighted
hold your CTRL key down on your keyboard
and hit your mask icon in the layer palette
at the same time.
You'll see little marching ants now.
Highlight your paper layer.
Click the mask button
(this is a square with a circle in it)
at the bottom of the layer palette.
*You should have two pictures in your paper layer now.
One of your paper and one of the mask.*
Hide your mask layer.
Highlight the paper layer.
Right click in the layer palette.
Hit Convert to Smart Object.
Right click again.
Click Rasterize Layer.
Now you can delete the gray mask layer.
I used these elements:
EL21, resize to 50%
Rotate to 90 CCW
Flip Horizontally
Rotate to your liking.
Duplicate this layer.
Move a little to you can see both shoes.
EL43, resize to 75%
PP8, resize to 50%
Move PP8 behind EL43.
Center.
Highlight EL43.
Grab your Magic Wand.
Click inside the circle.
Highlight PP8 layer.
Go to Select in your tool bar.
Click Inverse.
Hit the Delete key on your keyboard.
Go back to Select.
Click Deselect.
EL44, resize to 45%
EL37
EL31
EL20, resize to 65%
Open your tube.
Place to your liking.
Resize if you need to.
I resized my tube to 70%
*Duplicate this layer.
Flip Horizontally.*
EL22, resize to 50%
EL13, resize to 35%
EL39, resize to 40%
EL7, resize to 50%
EL18, resize to 40%
EL19, resize to 50%
EL1, resize to 35%
Place a drop shadow on all layers except:
EL37
paper
mask layer
Resize your siggy to your liking.
Make a new layer.
Type your name.
I used color fd06ce.
Stroke: Center, 2, White
Make another new layer.
Type your saying.
I used color 0dfb01.
Stroke, Outside, 3, Black
I placed a Drop Shadow on this layer.
MOST IMPORTANT!!
You must now do this:
Put the artist's name, website, and your license number
of the tube you used on the siggy!!
Add your name (ie: Designed by Your Name) behind this info.
Make sure this info is legible and clearly seen.
If you don't want to animate, Save as PNG.
YOU'RE DONE!!
(If you want to maintain your layers
Always Save as PSD first.
Then you can save it as a PNG.
When doing both these steps
It is important to change the title of the tag.
Example:
When I Save as PSD,
I always name the tag what I want.
Then, when saving as a PNG,
I add the number 1 behind the name of the tag.
Like this:
Spookilicious, Save as PSD
Spookilicious1, Save as PNG
Otherwise, your PNG will overwrite your PSD
Merging your tag into one layer only.)
**TO ANIMATE**
Open your animation window.
Set the time for .3
Show only your first tube layer.
Hide your second tube layer.
Move your ghost to where you would like him
to start out moving.
Click the square button, next to the trash can,
in the animation window.
This will duplicate the first animation frame.
You will now have frames 1 & 2.
Highlight frame 2 in the animation window.
(Leave the tube layers alone for right now.
We'll do that in a bit.)
Now go over to your Layer Palette.
Highlight your ghost layer.'
Move your ghost up or down to your liking.
Where you move this layer
is where your ghost will stop rising or falling.
Now go back to your animation window.
Highlight frame 1.
See that icon that looks like a slanted row of squares?
Place your cursor over it.
It will say: Tweens Animation Frames.
Click it.
A new window pops up.
Use these settings:

Click OK.
You should now have eight frames of animation.
Go ahead and click Play
to see your layers float.
Ok.
Now back to animating the rest of the siggy.
Highlight frame 1 in the animation window.
Duplicate this.
The frame you just duplicated will now be frame 2.
Click on frame 2 and while holding down the mouse,
move what is now frame 2 over
past frame 8.
Let go of the mouse.
Now you have nine frames.
Go to the eighth animation frame in the animation window.
Highlight frame 8.
Hit the tween button.
Use the same settings as before except
Frames to Add: 7
You will now have 16 animation frames.
For all odd numbered frames:
Show the first tube layer.
Hide the second tube layer.
For all even numbered frames:
Show the second tube layer.
Hide the first tube layer.
Click Play.
If you like what you see...
Save as PSD. Then Save for Web & Devises.
YOU'RE DONE!
I hope you had fun with this tut
and that you can use the tween technique
in other taggies you create!
HUGS!
*This tut was created by me, Redneck Tuts by Savage.
Any resemblance to any other is purely coincidental.*
Artist: ©Michi Art www.scrapsncrap.com SNC_STCA
Subscribe to:
Posts
(Atom)
About Me
- Savage
- Hi Ya'll! I'm Savage and I'd like to welcome you to Redneck Tuts. These are not your ordinary tuts, as they are geared toward those of us that don't have "working knowledge" of Photoshop or PSP. My tuts are all done in PS. They are designed to show you different techniques that you may not know. I hope you learn something that you can use in your creations in the future. Please, just have fun and put your own spin on these tuts. Be original and shine! Love Ya! ♥


