







♥ Follow Me ♥

♥Free Fonts♥



SUPPLIES NEEDED
TUBE OF CHOICE: I used the fantastic artwork of Gennadiy Koufay.
You must purchase a license to use this art.
You can find Gennadiy's art and get your license at www.cilm.com
SCRAPKIT: Coffee Addicts by Rieka Rafita.
This is a PTU kit. You can find it HERE.
FONT OF CHOICE: I used English for the wordart.
Echelon for Hot n Rich and the name.
I used Photoshop for this tut.
♥♥♥♥♥♥♥
Open a canvas, transparent background, 650x650 pixels.
Open RR_Paper10. Fill the canvas with this.
Go to your tool bar and grab an eraser with a soft edge.
Randomly erase the edges of Paper12 to give it a soft look.
Open element RR_Swag.
Center this on top of Paper10.
Open RR_Cup.
Place this a little off to the right.
Resize to fit.
Now place your tube of choice under RR_Cup.
To make it look as though she is in the cup,
Place her behind the cup.
Position her so her arm is resting on the cup.
Erase the spoon that covers her legs.
I used a soft edged eraser.
These elements I used on top of the Swag and under the tube:
RR_Bow1
RR_Bow4
RR_Butterfly2
Resize and position where you like.
On top of the Cup and tube, I used:
RR_HeartGarland
RR_Beans
RR_BottleCap
RR_CoffeeMaker
RR_CarCup
RR_CoffeeCup3
RR_CoffeePot
RR_Tag
RR_ToGoCup
Place a drop shadow on the elements you've used.
Make a new layer on top of all layers.
Type the name you want in the font you want.
I used English.
I used the eye dropper tool and clicked on the Cup for color.
Size it to fit and position where you like.
I used the same font for Hot n Rich.
For the rest of the text, I used Echelon.
Using the eye dropper, I clicked on the center of the Tag.
This is the color I used for the text.
Then I used Stroke 2, outside, color fea6da.
Position all text as you like.
MOST IMPORTANT!!
You must now do this:
Put the artist's name, website, and your license number
of the tube you used on the siggy!!
Add your name (ie: Designed by Your Name) behind this info.
Make sure this info is legible and clearly seen.
Save as PNG.
YOU'RE DONE!!
I hope you had fun with this tut!
HUGS!
*This tut was created by me, Redneck Tuts by Savage.
Any resemblance to any other is purely coincidental.*
Artist: ©Gennadiy Koufay CI-6388LM
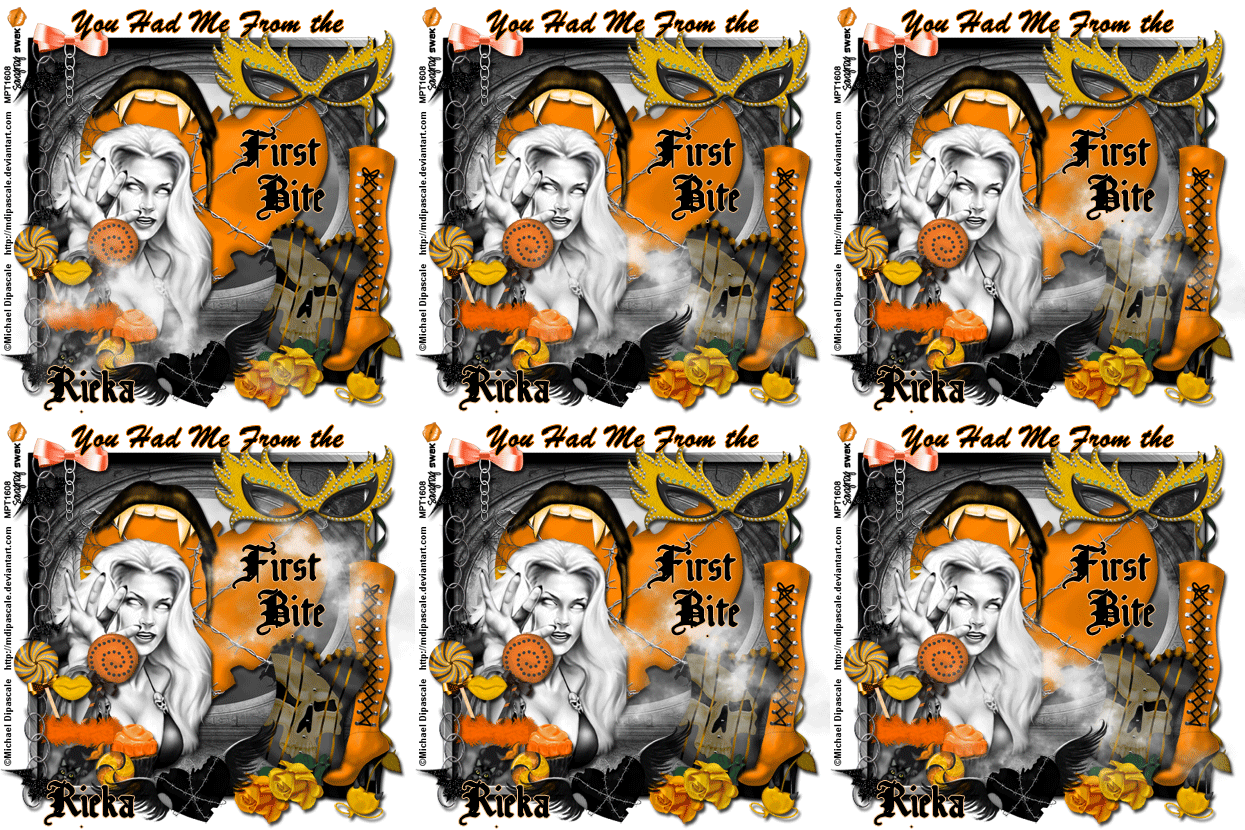
FIRST BITE TUT
SUPPLIES NEEDED
TUBE OF CHOICE: I used the fantastic artwork of Armando Huerta.
You must purchase a license to use his art.
You can find Armando's art and get your license HERE.
SCRAPKIT: Happy Halloween by Rieka Rafita.
This is a PTU kit. You can find it HERE.
FONT OF CHOICE:
I used First BrokenPlanewing for the name and First Bite.
BrushScript MT for the other text.
I used Photoshop for this tut.
♥♥♥♥♥♥♥
In this tut we'll be animating the fog.
If you don't wish to animate, just skip the steps marked with **BLUE**.
Open a canvas, white background, 600x600 pixels.
Open RR_Frames2.
Resize and center on canvas.
Open RR_Paper1. Center it inside frame.
Open element RR_WireLove.
Center this on top of Paper1, inside frame.
Open RR_VampMouth.
Rotate slighty and place on top left side of WireLove.
To make it look like it's biting,
Erase the bottom of VampMouth.
Now open your tube and position where you like.
Resize to fit.
The elements I used on top of the tube (lower left corner):
RR_Bag2
RR_Lolipop1
RR_Lolipop2
RR_Lips2
RR_Cupcake1
RR_Candy2
Elements I used on the right of the siggy:
RR_Mask
RR_Boot
RR_Corset
RR_Flower1
RR_Flower2
RR_DevilCherry
I place RR_WingHeart at center bottom.
RR_Bow1 top left of frame.
Place drop shadow on all elements and tube.
Open RR_Fog.
Place in lower left corner.
(If you are not animating, place Fog wherever you'd like.)
**FOR ANIMATION:**
Duplicate the Fog three times.
You should now have four layers of the Fog.
Move your second layer of Fog a little to the right and up slightly.
Do the same for your third and fourth layers of Fog.
Make a new layer on top of all layers.
Type the name you want in the font you want.
I used Broken Planewing, color: black.
I also used Stroke 2, outside, color: f5c087.
Size it to fit and position where you like.
I used the same font and effects for First Bite.
For the other text, I used BrushScript MT, color: black.
Stroke 2, center, color: f5830a.
MOST IMPORTANT!!
You must now do this:
Put the artist's name, website, and your license number
of the tube you used on the siggy!!
Add your name (ie: Designed by Your Name) behind this info.
Make sure this info is legible and clearly seen.
If you don't want to animate, Save as PNG.
YOU'RE DONE!!
**TO ANIMATE:**
Open the Animation Window.
You will need six frames.
Set the time for .04.
For the first frame:
Show only the first layer of the Fog.
Second frame:
Show the first and second layers of Fog.
Third frame:
Show the first three layers of Fog.
Fourth frame:
Show all four layers of Fog
Fifth frame:
Show only the first layer of Fog.
Sixth frame:
Show the first and second layers of Fog.
Save as PSD. Then save it again as: Save for Web & Devices.
YOU'RE DONE!
I hope you had fun with this tut!
HUGS!
*This tut was created by me, Redneck Tuts by Savage.
Any resemblance to any other is purely coincidental.*
Artist: ©Armando Huerta www.armandohuerta MPT1608

FALLING FOR YOU TUT
SUPPLIES NEEDED
TUBE OF CHOICE: I used the beautiful artwork of Jennifer Janesko.
You must purchase a license to use her art.
You can find Jennifer's art and get your license HERE.
SCRAPKIT: Love of Aumtumn by Rieka Rafita.
This is a PTU kit. You can find it HERE.
FONT OF CHOICE: I used:
Ville de Geneve ES
I used Photoshop for this tut.
♥♥♥♥♥♥♥
Let's get creative!
Open a canvas, transparent background, 600x600 pixels.
Open your tube and center it on your canvas.
Open RR_Paper15.
Resize to fit your canvas and place behind your tube.
Use any random eraser to erase the edges.
I placed these elements at the top of the tube:
RR_BasketFlower
RR_Leave4
RR_Leave7
RR_Leave8
RR_Butterfly2
RR_Pumpkin1
RR_Flower2
RR_Bow4
Behind the tube, I used:
RR_FallingLeave
RR_Love
I duplicated these two layers
and RR_Butterfly2.
Then I flipped them horizontally.
Resize all elements to fit as you like.
Make a new layer on top of all layers.
Type the name you want in the font you want.
I used color f4e002.
Stroke 2, outside, black.
MOST IMPORTANT!!
You must now do this:
Put the artist's name, website, and your license number
of the tube you used on the siggy!!
Add your name (ie: Designed by Your Name) behind this info.
Make sure this info is legible and clearly seen.
Save as PNG.
YOU'RE DONE!!
I hope you enjoyed this tut!
HUGS!
*This tut was created by me, Redneck Tuts by Savage.
Any resemblance to any other is purely coincidental.*
Artist: ©Jennifer Janesko www.janesko.com CI-6388LM.
About Me
- Savage
- Hi Ya'll! I'm Savage and I'd like to welcome you to Redneck Tuts. These are not your ordinary tuts, as they are geared toward those of us that don't have "working knowledge" of Photoshop or PSP. My tuts are all done in PS. They are designed to show you different techniques that you may not know. I hope you learn something that you can use in your creations in the future. Please, just have fun and put your own spin on these tuts. Be original and shine! Love Ya! ♥


