







♥ Follow Me ♥

♥Free Fonts♥


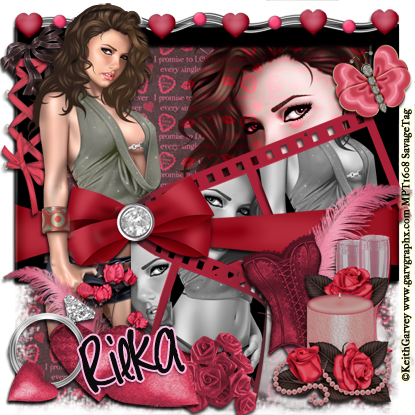
SUPPLIES NEEDED
TUBE OF CHOICE: I used the fabulous artwork of Keith Garvey.
The tube I used came with a close up.
You must obtain a license to use his art.
You can find Keith's art and get your license HERE.
SCRAPKIT: Valentine of Twilight by Rieka Rafita.
This is a PTU kit. You can find it HERE.
FONT OF CHOICE: ”
I used Pea Carrie Script.
I used Photoshop for this tut.
♥♥♥♥♥♥♥
We'll be playing with the Eraser and Blending Options.
Let's have some fun!
Open a canvas, transparent background, 650x650 pixels.
Open RR_Paper11.
Open RR_Frames1.
Center towards top of canvas.
Open RR_Film.
Place this toward the bottom of Frames1.
To make it look like it's behind the bow
Duplicate Frames1 and place this on top of Film.
Stay on the duplicate layer of Frames1.
Now erase the black portion of Frames1 that covers Film.
Resize Paper11 to fit just inside of Frames1 horizontally.
Keep the length from top to bottom.
These are the elements I used:
RR_HeartBead
RR_Butterfly
RR_LaceUp
RR_Bow3
RR_Flower5
RR_Cloud
RR_Feather
RR_HeartPillow
RR_Ring
RR_Flower3
RR_Corset
RR_CandlesWineGlasses
Resize all elements to your liking
and place where you want.
Click on Paper11.
Using a soft edge eraser
Erase around the elements at the bottom
leaving just a tad of Paper11 showing.
Open your tube.
Place your tube on top of your first Frames1 layer
behind the film.
Click on the copy of Frames1.
Erase where your tube's head is.
Now erase where her arm is.
An easy way to do this is to
move your tube on top of the copy of Frames1.
Now you can see her arm.
Click on copy of Frames1 and erase.
Then move your tube back behind Film.
Grab your close up.
Place her behind your first layer of Frames1.
Click on Frames1.
Grab your magic wand and click inside the frame.
Now click on your close up.
Go to Select in the tool bar.
Click Inverse.
Hit the Delete button on your keyboard.
Go back to Select.
Click Deselect.
Duplicate your close up layer.
Click on first close up layer.
Right click on this layer in the Layer Pallette.
Select Blending Options.
Click Luminosity, 100%.
Click on duplicate layer of close up.
Select Blending Options.
Click Soft Light, 100%.
We're going to place your tube inside the Film now.
Open your tube.
Place it on top of Film
Duplicate it three times.
Hide all layers except the first one.
.Position your first tube layer inside a frame of Film.
Make sure you have it where you want it.
*Click on Film layer.
Grab the magic wand and select one frame of Film.
Click inside that frame.
Click on your first tube layer.
Go to Select.
Click Inverse.
Hit the Delete button on your keyboard.
Go back to Select.
Click on Deselect.*
Now show your second tube layer.
Repeat the above steps marked with *.
Show your third tube layer.
Repeat steps *.
Show your fourth tube layer.
Repeat steps *.
Now for all four tube layers:
Right click on the layer in the layer pallette.
Select Blending Options.
Click Luminosity, 100%.
Place a drop shadow on all elements.
Make a new layer on top of all layers.
Type your name.
Position it where you like.
I used the color black with Stroke, fabae1, outside, 3.
MOST IMPORTANT!!
You must now do this:
Put the artist's name, website, and your license number
of the tube you used on the siggy!!
Add your name (ie: Designed by Your Name) behind this info.
Make sure this info is legible and clearly seen.
To maintain the layers individually Save As PSD first.
Then rename the sig adding a number or letter
and save as PNG.
YOU'RE DONE!!
I hope you had fun with this tut!
HUGS!
*This tut was created by me, Redneck Tuts by Savage.
Any resemblance to any other is purely coincidental.*
Artist: ©Keith Garvey www.garvgraphx.com MPT1608
 SUPPLIES NEEDED
TUBE OF CHOICE: I used the fantastic artwork of
Alex Marek-Musat.
You must obtain a license to use his art.
You can find Alex's art
and get your license at InToXxiKaTed InTenTionz.
SCRAPKIT: Blush by ScrapinDaisy.
This is a PTU kit. You can find it HERE.
FONT OF CHOICE: I used:
Euphorigenic – for the name, “Work It” and “Max”.
Chikita – for the words “to the”
I used Photoshop for this tut.
♥♥♥♥♥♥♥
Let's have some fun!
Open a canvas, transparent background, 650x650 pixels.
Open Paper011.
Resize to fit entire canvas.
Open Element083.
Center on canvas.
Open Paper017.
Resize so the edges fit inside Element083.
Open your tube.
Center and resize to your liking.
Open Element050.
Place this on top of tube at bottom of frame, center.
Now move this layer under the frame.
Now we'll place the Elements on the tag.
These are the ones I used:
Element004
Element038
Element024
Element030
Element057
Element027
Element053
Element012
Element067
Element042
Element069
Element071
Place a drop shadow on all Elements and tube.
Make a new layer on top of all layers.
Type the name you want in the font you want.
I used black with stroke, outside, 3, color fab7b7.
Center this at the bottom of your siggy.
Make another new layer.
Type “Work It” using fab7b7 for color.
Stroke black, outside, 3.
Make a new layer.
To create the word “Max”
use the same font and effects.
Make another new layer.
Type the words “to the”
I used the same colors and effects
as the name layer.
Position all text where you want it.
MOST IMPORTANT!!
You must now do this:
Put the artist's name, website, and your license number
of the tube you used on the siggy!!
Add your name (ie: Designed by Your Name) behind this info.
Make sure this info is legible and clearly seen.
To maintain the layers individually Save As PSD first.
Then rename the sig adding a number or letter
and save as PNG.
YOU'RE DONE!!
I hope you had fun with this tut!
HUGS!
*This tut was created by me, Redneck Tuts by Savage.
Any resemblance to any other is purely coincidental.*
Artist: ©Alex Marek-Musat www.erotic-art.ro InToX-CT2

SUPPLIES NEEDED
TUBE OF CHOICE: I used the beautiful artwork of Barbara Jensen.
The tube I used came with a close up.
You must purchase a license to use her art.
You can find Barbara's art and get your license HERE.
SCRAPKIT: Winter Warmth by Rieka Rafita.
This is a PTU kit. You can find it HERE.
FONT OF CHOICE: I used Splendid ES.
I used Photoshop for this tut.
♥♥♥♥♥♥♥
In this tut we'll be using Noise to create sparklies.
If you don't wish to animate, just skip the steps marked **BLUE**.
Open a canvas, white background, 600x600 pixels.
Open RR_Paper10.
Size it to fit your canvas.
Open RR_Moon.
Place in upper left corner.
Open RR_Flower1.
Place in center at bottom of canvas.
(We'll place the rest of the elements on the siggy
Then move Flower1 layer on top of them.)
Open your tube.
Center it on canvas behind Flowers1.
I wanted her hand to show on top of the flowers.
Move your tube on top of the flowers.
Click on the flower layer.
Erase where her hand is.
Move your tube back behind the flowers.
Open your close tube.
Position this behind your tube.
Duplicate this layer.
Highlight your first close up layer.
Right click this layer in your layer pallet.
A window will pop up.
Go to Blending Options (second from top).
Use these settings:
Blending Mode: Luminosity
Opacity: 100%
Fill Opacity: 100%
Channels: Check R, G, B
Knockout: None
Check:
Blend Clipped Layers as Group
Transparency Shapes Layer
Blend If: Gray
This Layer: 255
Underlying Layer: 255
Highlight your second close up layer.
Right click.
Go to Blending Options.
Blend Mode: Screen
Set the rest as above.
These are the elements I used:
RR_Icicles
RR_Curtain
RR_Wreath2
RR_Bow2
RR_ChristmasBall1
RR_ChristmasBall2
RR_Snowdrift1
RR_Rubber
RR_Bow3
Position all elements as you like.
Place drop shadows on all layers except on:
Snowdrift1
Icicles
Moon
Paper
Grab a soft edged eraser.
Click on Paper layer.
Erase around the edges of Paper to soften.
**FOR ANIMATION**
Duplicate Icicles layer twice.
Do the same to Bow3 layer.
Click on your first Icicles layer.
Go to Filter, Noise, Add Noise.
When the Noise window pops up
Type 8 in the box for Amount.
Check Uniform and Monochromatic.
Do the same for your next two layers of Icicles.
Second layer: 10 for Noise
Third layer: 12 for Noise.
Click on your first Bow3 layer.
Add Noise: 12
Second layer: 14
Third layer: 16
Make a new layer.
Type your name.
I used color 293a6d.
Stroke, outside, 2, color d6d6fb.
MOST IMPORTANT!!
You must now do this:
Put the artist's name, website, and your license number
of the tube you used on the siggy!!
Add your name (ie: Designed by Your Name) behind this info.
Make sure this info is legible and clearly seen.
If you don't want to animate, Save as PNG.
YOU'RE DONE!!
(If you want to maintain your layers
Always Save as PSD first.
Then you can save it as a PNG.
When doing both these steps
It is important to change the title of the tag.
Example:
When I Save as PSD,
I always name the tag what I want.
Then, when saving as a PNG,
I add the number 1 behind the name of the tag.
Like this:
Winter Warmth, Save as PSD
Winter Warmth1, Save as PNG
Otherwise, your PNG will overwrite your PSD
Merging your tag into one layer only.)
**TO ANIMATE:**
Open the Animation Window.
You will need four frames.
Set the time for 0.
For the first frame:
Show only the first layers of:
Icicles
Bow3
Second frame:
Show the second layers only of both.
Third frame:
Show only the third layers of both.
Fourth frame:
Show the seconds layers only.
Save as PSD. Then Save for Web & Devises.
YOU'RE DONE!
I hope you had fun with this tut!
HUGS!
*This tut was created by me, Redneck Tuts by Savage.
Any resemblance to any other is purely coincidental.*
Artist: ©Barbara Jensen www.eroticartistgallery.com BJ2597
About Me
- Savage
- Hi Ya'll! I'm Savage and I'd like to welcome you to Redneck Tuts. These are not your ordinary tuts, as they are geared toward those of us that don't have "working knowledge" of Photoshop or PSP. My tuts are all done in PS. They are designed to show you different techniques that you may not know. I hope you learn something that you can use in your creations in the future. Please, just have fun and put your own spin on these tuts. Be original and shine! Love Ya! ♥


