







♥ Follow Me ♥

♥Free Fonts♥


Monday, June 6, 2011

SUPPLIES NEEDED
TUBE OF CHOICE: I used the awesome artwork of Misticheskaya.
The tube I used came with mulitple layers.
This included one female and one male.
I used both of these tubes.
You must have a license to use this art.
You can find Misticheskaya's art and get your license HERE.
SCRAPKIT: Dreaming by Designs by Sarah.
This is a PTU kit.
You can find it HERE.
FONT OF CHOICE: I used Scriptina Pro.
I used Photoshop for this tut.
♥♥♥♥♥♥♥
Let's have some fun!
Open a new canvas, 650x650.
Transparent background.
Open paper 10.
Resize to 90%.
Center on canvas.
Use a soft edged eraser
and erase around the edges to create a soft look.
Open frame 3.
Resize to 75%.
Center.
Open frame 2.
Resize to 75%.
Place in top right corner.
Highlight frame 3 layer.
Erase the part of this frame
that you can see inside frame 3.
Open moon.
Resize to 50%, flip Horizontally.
Place behind frame 3.
I erased the ribbon on frame 3
that was hanging down inside the circle.
Open your male tube.
You may have to resize him to fit.
I resized mine down to 65%.
Place him so his face shows inside frame 3.
Highlight frame 3 layer.
Grab your magic wand.
Highlight your male tube layer.
Go to Select in your toolbar.
Click Inverse.
Hit the Delete key on your keyboard.
Go back to Select.
Click Deselect.
With your male tube layer still highlighted
Go to the upper left corner in your Layer Pallete.
Using the down arrow,
Click Overlay.
Leave the Opacity settings at 100%.
(This is located in the upper right corner of the Layer Pallete.)
Open flower 3.
Center at bottom of canvas.
Open your female tube.
You may have to resize her.
I resized to 40%.
Center her within flower 3.
Grab a soft edged eraser.
To make her look like she's standing inside the flower
Erase some petals until you are happy with it.
Use my tag as a guide.
These are the elements I placed on top of this:
ribbon 2, resized to 35%, flip Horizontally
flower 4, resized to 50%
ribbon 4, resized to 50%, flip Horizontally
butterfly 2, resize to 50%
flower 11, resize to 50%
flower 8, resize to 35%, flip Horizontally
wings 1, resize to 35%
flower 9, resize to 20%
stars, resize to 90%
flower 7, resize to 50%
butterfly 4
sparkles 1
I placed a drop shadow on everything except:
sparkles 1
male tube
paper 10
Make a new layer.
Type your name.
I used color: 00d2e9.
Stroke, Outside, 3, color 0d1ce4
And I placed a drop shadow on it.
MOST IMPORTANT!!
You must now do this:
Put the artist's name, website, and your license number
of the tube you used on the siggy!!
Add your name (ie: Designed by Your Name) behind this info.
Make sure this info is legible and clearly seen.
Save as PSD to maintain layers.
Then save as PNG, remembering to use a number behind your sig title.
YOU'RE DONE!!
I hope you had fun with this tut!
♥HUGS!♥
*This tut was created by me, Redneck Tuts by Savage.
Any resemblance to any other is purely coincidental.*
Artist: ©Misticheskaya www.picsfordesign.com PFD_Savage
SUPPLIES NEEDED
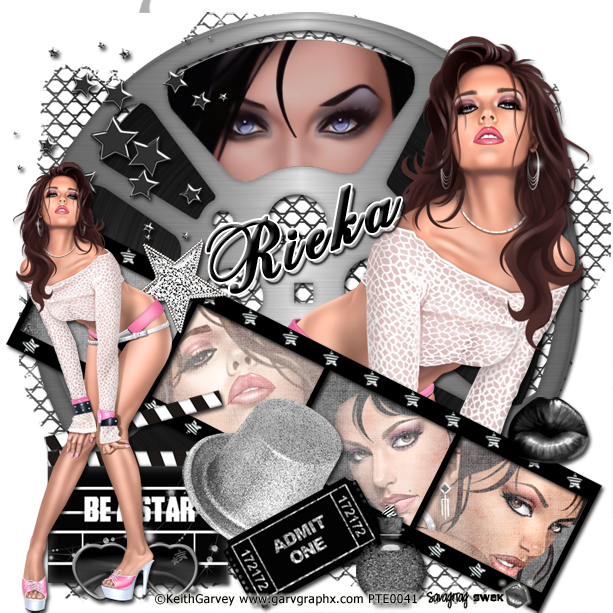
TUBE OF CHOICE: I used the awesome artwork of
Keith Garvey.
I used five different tubes, all were Close Ups
with one tube being regular sized and a Close Up.
You must have a license to use this art.
You can find his art and get your license HERE.
SCRAPKIT: Be a Star Collab by Rieka Rafita & Roo.
This is a PTU kit. You can find it HERE.
FONT OF CHOICE: I used Zenith Script ES.
I used Photoshop for this tut.
♥♥♥♥♥♥♥
Let's have some fun!
Open a canvas, transparent background, 700x700 pixels.
Open element, e38.
Reduce size to 90%.
Center on canvas.
Open e34.
Center, leaving a little room at the bottom of canvas.
Open your main tube and place where you like.
You can use my taggie as a guide.
I placed this tube over toward the right.
Open e05.
Rotate it to your liking and center.
Open p13.
Center and place under e05.
Highlight e05 layer.
Grab your magic wand.
Holding down your Shift key
Click inside each square of e05 (filmstrip).
Highlight p13.
*Go to Select in your toolbar.
Click it.
When you see a drop down menu
Click Inverse.
Hit the Delete key on your keyboard.
Go back to Select,
Click Deselect.*
(We will be using these steps a lot in this tut.
When you see * please come back and
repeat the magic wand, select steps.)
Open the tubes you want in e05 (filmstrip).
Place them behind e05 and on top of p13.
Position them where you like.
Highlight e05 layer.
Grab the magic wand.
This time you will only be clicking inside one square.
Highlight the tube layer for the square you just clicked.
Now follow the Select steps *.
Repeat this for all three tubes inside e05.
Remember to highlight e05 layer each time
and select a different square.
Highlight one of your tube layers you just finished.
In the upper left corner of your Layer Pallete
you will see the word 'Normal'.
Click on the down arrow next to it.
A drop down menu appears.
Click on Overlay.
Leave the Opacity at 100%.
(That's located in the upper right corner of your Layer Pallete.)
Do this for the other two tube layers in the filmstrip.
Open e87.
Place on top of e05.
Open e94.
Resize to 50%.
Place in upper left corner.
Open e33.
Resize to 50%.
Place in lower left corner.
On top of e33
I placed these elements:
e76, resize to 50%
e358, resize to 50%
e02, resize to 35%
e10, resize to35%
e79, resize to 35%
Open the tube (not a close up) of your liking.
Position this in the lower left corner.
Now we'll place the eyes inside e34, the film wheel.
Open a Close Up tube.
In the upper right corner of your Layer Pallete
Set the Opacity at 80%.
Position this layer so her eyes are centered
in the top of the film wheel.
You may need to play around with it
to get it just right.
Highlight e34 layer.
Grab your magic wand.
Click inside the top of e34
where the film is showing.
(The area I put the eyes in on my taggie.)
Highlight your Close Up tube layer.
Go to Select, Inverse.
Hit the Delete key on your keyboard.
Go back to Select, click Deselect.
If the eyes aren't lined up right,
Just go to Edit in your toolbar
and Click Step Backward.
Just keep doing this until your magic wand ants are gone.
Then realign your tubes eyes
and repeat the magic wand, select steps.
Place a drop shadow on everything except:
e90
p13
And the four tube layers you placed inside e05 and e34.
Resize your siggy to your liking.
Make a new layer on top of all layers.
Type the name you want in the font you want.
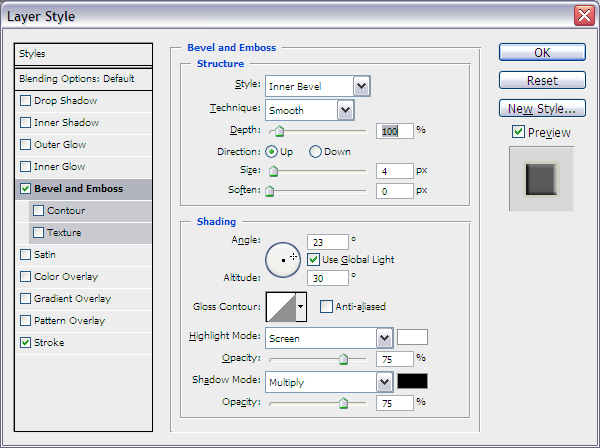
I added Bevel and Emboss
with these settings...
Next I added Stroke.
Outside, 2, color: white
I added a drop shadow also.
MOST IMPORTANT!!
You must now do this:
Put the artist's name, website, and your license number
of the tube you used on the siggy!!
Add your name (ie: Designed by Your Name) behind this info.
Make sure this info is legible and clearly seen.
Save as PSD to maintain layers.
Then save as PNG, remembering to use a number behind your sig title.
YOU'RE DONE!!
I hope you had fun with this tut!
HUGS!
*This tut was created by me, Redneck Tuts by Savage.
Any resemblance to any other is purely coincidental.*
Artist: ©Keith Garvey www.garvgraphx.com PTE0041
Sunday, June 5, 2011
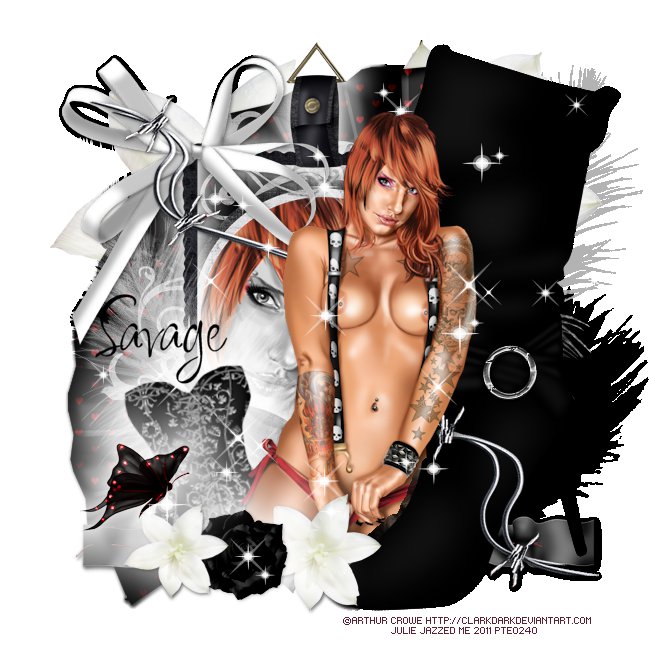
Julie made this awesome tag from my tut Emo Glam.
I totally love what she did with it!
♥THANK YOU JULIE!♥
Julie doesn't have a blog
but you can hook up her on Facebook
and see all her fabby designs there!
Just click HERE.
Subscribe to:
Posts
(Atom)
About Me
- Savage
- Hi Ya'll! I'm Savage and I'd like to welcome you to Redneck Tuts. These are not your ordinary tuts, as they are geared toward those of us that don't have "working knowledge" of Photoshop or PSP. My tuts are all done in PS. They are designed to show you different techniques that you may not know. I hope you learn something that you can use in your creations in the future. Please, just have fun and put your own spin on these tuts. Be original and shine! Love Ya! ♥


