





♥ Follow Me ♥

♥Free Fonts♥


Tuesday, February 26, 2013
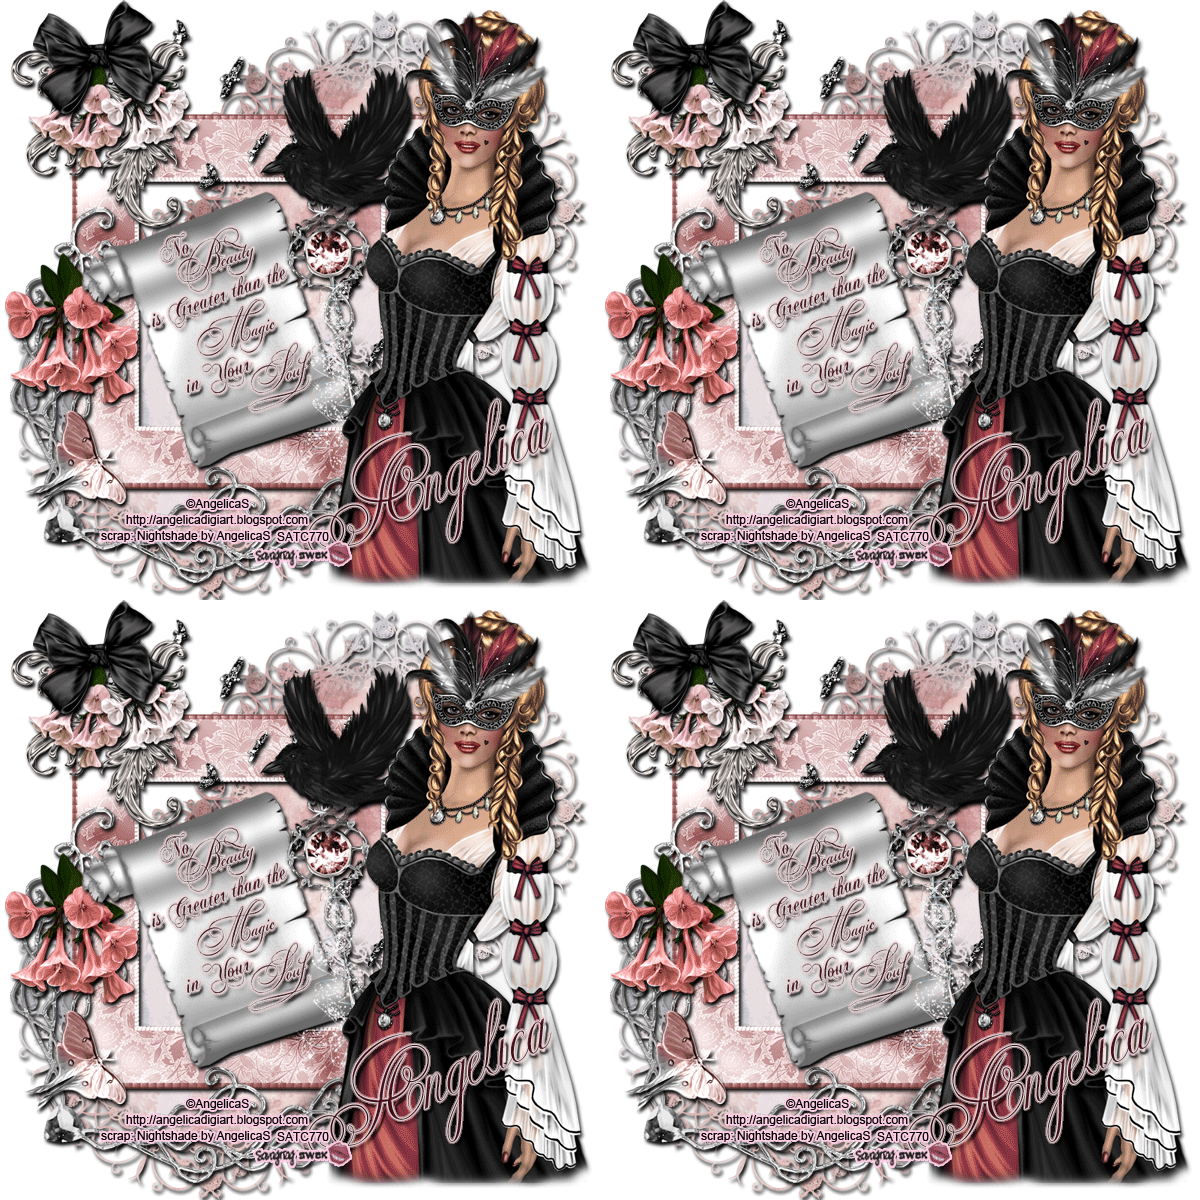
SUPPLIES NEEDED
TUBE OF CHOICE: I used the beautiful artwork of
Angelica Sellers.
This tube is called The Mask.
You must have a license to use this art.
You can find this art and get your license HERE.
SCRAPKIT: Nightshade by Angelica Sellers.
You can find it HERE.
SUPPLES: This is the animated ribbon & word art.
These supplies are for Personal Use ONLY.
You can snag it HERE.
FONT OF CHOICE: I used Copper Alt Caps Expert.
I used Photoshop for this tut.
♥♥♥♥♥♥♥
In this tut we'll use some premade animation.
If you don't wish to animate, just skip the steps marked *BLUE*
Use my tag as a guide for placement of elements.
Open a canvas 800x800 pixels.
Transparent background.
If you are animating,
Flood fill with the color of your choice.
Open paper19.
In the photomasks folder,
Open mask01Photoshop.
With the mask01 layer highlighted,
Hold your CTRL key down on your keyboard
and hit your mask icon in the layer palette
at the same time.
You'll see little marching ants now.
Highlight your paper19 layer.
Click the mask button
(this is a square with a circle in it)
at the bottom of the layer palette.
*You should have two pictures in your paper layer now.
One of your paper and one of the mask.*
Hide your mask layer.
Highlight the paper layer.
Right click in the layer palette.
Hit Convert to Smart Object.
Right click again.
Click Rasterize Layer.
Now you can delete the gray mask layer.
Duplicate your new mask layer.
Place both layers to your liking.
Open your tube.
Place over to the right.
Grab a soft edged eraser.
Erase around the bottom edges to create a soft look.
We will now build our tag on top of the masks layers
and under the tube layer.
Highlight the second mask layer.
We will place our elements on top of this.
Make sure the tube stays at the top of the Layer Palette.
These are the elements I used.
Use my tag as a guide for placement.
element30
element38
element50, resize to 50%
element47, resize to 25%
Flip this layer Vertically.
element11, resize to 50%
element48, resize to 45%
element49, resize to 25%
element12, resize to 35%
element04
resize this layer to 50%Wide, 65%High
Open your Wordart
resize this to 50%Wide, 60%High
I used some effects on the wordart.
Color Overlay, color: 6c2637
Stroke, Outside, 1, color: dedede
Outer Glow
Drop Shadow
Bevel & Emboss
*Highlight Mode: Screen, color fbdfdf
Shadow Mode: Multiply, color 672434*

Continue with these elements:
element07
element51, resize to 45%
Open AngelicaSbling46 in your supplies.
You will see four layers.
Place all four layers onto your taggie.
Place them directly on top of each other on your tag.
Use my tag as a guide for placement.
Place a drop shadow on all your layers except:
AngelicaSbling46 layers
Resize the siggy to your liking.
Make a new layer.
Type your name on the taggie.
I used color 6c2637
I used the same effects as the wordart.
MOST IMPORTANT!!
You must now do this:
Put the artist's name, website, and your license number
of the tube you used on the siggy!!
Add your name (ie: Designed by Your Name) behind this info.
Make sure this info is legible and clearly seen.
If you don't want to animate, Save as PNG.
YOU'RE DONE!!
(If you want to maintain your layers
Always Save as PSD first.
Then you can save it as a PNG.)
**TO ANIMATE**
In the Layer Palette,
Hide all layers of AngelicaSbling46
except the first layer.
Open the Animation Window.
Set the time for .2
Show all the rest of the layers in your tag.
Click the square button, next to the trash can,
in the animation window.
This will duplicate the first animation frame.
Do this two more times.
You should now have four animation frames.
Highlight the second animation frame.
Go over to your Layer Palette.
Leave everything as is except:
Hide the first layer of bling.
Unhide the second bling layer.
Now go back to your animation window.
Highlight the third animation frame.
Go over to your Layer Palette.
Leave everything as is except:
Hide the second layer of bling.
Unhide the third bling layer.
Back to your animation window again.
Highlight the fourth animation frame.
Go over to your Layer Palette.
Leave everything as is except:
Hide the third layer of bling.
Unhide the fourth bling layer.
Click Play.
If you like what you see...
Save as PSD. Then Save for Web & Devises.
YOU'RE DONE!
I hope you had fun with this tut
and that you can use the different techniques
in other taggies you create!
HUGS!
*This tut was created by me, Redneck Tuts by Savage.
Any resemblance to any other is purely coincidental.*
Artist: ©Angelica S. http://angelicadigiart.blogspot.com SATC770
Saturday, January 19, 2013
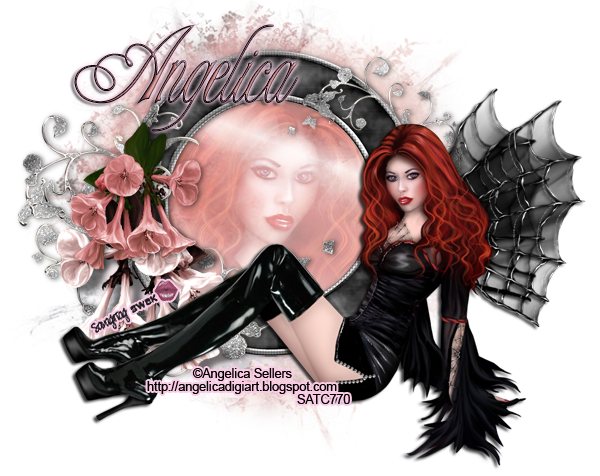
SUPPLIES NEEDED
TUBE OF CHOICE: I used the beautiful artwork of
Angelica Sellers.
This tube is called Mystique.
You must have a license to use this art.
You can find this art and get your license HERE.
SCRAPKIT: Nightshade by Angelica Sellers.
You can find it HERE.
FONT OF CHOICE: I used Champagne.
I used Photoshop for this tut.
♥♥♥♥♥♥♥
This will be a quick tut using a pre-made cluster frame.
All we will be doing is placing a tube
and adding a name.
Angelica's cluster frame comes with many layers.
It also includes drop shadows.
So your work is already done for you!
You can rearrange the layers
or move them around to your liking.
For this tut,
I left everything as is.
Just play around and have FUN!
Open Nightshade kit.
Inside there,
you will find a folder called Cluster Frame.
Open that.
There is only one psd in there, clusterpsd.
Open it.
Open your tube.
Duplicate your tube layer.
Resize the duplicated tube to 50%.
Move the duplicated tube layer
on top of all cluster frame layers.
I flipped mine Horizontally.
Place a drop shadow on this layer.
Place the first tube layer you opened
between Raster 5 shadow one layer
and Raster 7 layer.
No drop shadow on this tube layer.
Now highlight Raster 5 shadow one layer.
Grab your Magic Wand.
Click inside the frame.
Highlight your tube layer.
Go up to Select in your tool bar at the top of your screen.
Click Inverse.
Hit the Delete key on your keyboard.
Go back to Select.
Click Deselect.
With your tube layer still highlighted,
Go to the upper left corner of your Layer Palette.
Click the down arrow next to the word Normal.
In the drop down menu,
Click Screen.
Leave the Opacity setting at 100%.
Now go over to the left of your screen and in the tool bar
find your Crop tool.
This will look like a weird square with a
diagonal line through it.
Crop your taggie to get rid of all the excess background.
Resize the siggy to your liking.
Make a new layer.
Type your name on the taggie.
I used color d78788.
Now place a Stroke:
Stroke, Inside, 1, Black
I also used:
Bevel & Emboss

I also used a Drop Shadow and Outer Glow.
Outer Glow, color fbd6ec

MOST IMPORTANT!!
You must now do this:
Put the artist's name, website, and your license number
of the tube you used on the siggy!!
Add your name (ie: Designed by Your Name) behind this info.
Make sure this info is legible and clearly seen.
Always Save as PSD first.
Then you can save it as a PNG.
YOU'RE DONE!
I hope you had fun with this tut
and that you can use the different techniques
in other taggies you create!
HUGS!
*This tut was created by me, Redneck Tuts by Savage.
Any resemblance to any other is purely coincidental.*
Artist: ©Angelica S. http://angelicadigiart.blogspot.com SATC770
Monday, December 31, 2012

SUPPLIES NEEDED
TUBE OF CHOICE: I used the awesome tube
Nathalia2 by Sweet-PinUp.
You must have a license to use this art.
You can find this art and get your license HERE.
SCRAPKIT: Celebrate 2013 by Black Widow Creationz.
You can find it HERE.
FONT OF CHOICE: I used three different fonts:
from ~ SweetheartScriptLimited
Sweet-PinUp ~ Sverige Script Demo
CT Tags N Tuts ~ Scrappy Looking Demo
I used Photoshop for this tut.
♥♥♥♥♥♥♥
We're going to be making a blog header.
Sizes vary for this,
so go ahead and adjust anything that needs it.
This tut is to be used as a guide only.
Open a canvas 1000 wide x 500 high pixels.
Transparent background.
Open PP10.
Move to the left side of your canvas.
Duplicate this layer.
Move the duplicated layer toward the right.
Over lap them a little.
Highlight the duplicated layer in the Layer Palette.
Right click in the Layer Palette.
In the menu that appears,
Click Merge Down.
You now have one PP10 layer.
We're done with this for now,
but will come back to it in a minute.
Open PP5.
Resize this to 61%.
Duplicate this layer.
Put these two layers side by side on the canvas.
Overlap them just a bit.
Highlight the duplicated layer.
Right click in the Layer Palette.
Click Merge Down in the pop up menu.
Center on canvas.
Back to PP10 layer.
Highlight this layer.
Go to the tool bar on the left of your screen.
Look for the square dotted icon.
It should be right below your arrow icon.
Click the square marque icon.
You will be making a rectangle that frames
your PP5 layer.
Holding down your mouse,
Place your mouse at the upper left corner of PP5 layer.
Drag your mouse to the upper right corner
then down the right side to the lower right corner.
You should see a rectangle that frames your PP5 layer
that looks like marching ants.
Let go of the mouse.
Go up to Edit in the tool bar at the top of your screen.
In the drop down menu,
Click Cut.
You just made a frame.
These are the special effects I used on this layer:
Bevel & Emboss

Stroke, 5, Center, Black
_html_m6f67073d.png)
Keep this layer on top in your Layer Palette.
If you now highlight PP5 layer,
everything you put on your header will be placed
under the frame you just made.
So go ahead and highlight PP5 layer.
Remember, use my header as a guide
for placement and size of elements.
Now Open El10.
Place to your liking.
Open your tube.
Duplicate this layer.
Resize the first tube layer to 80%.
Resize the duplicated tube to 25%.
Hide the duplicated tube layer for now.
Highlight the first tube layer.
Place to your liking.
Go to the upper right corner of the Layer Palette.
In the box next to the word Opacity,
type in 45.
The word to the left of Opacity,
should say Normal.
Highlight PP10 layer.
Grab the Magic Wand in the tool bar on the left of the screen.
Click inside your frame.
Highlight the tube layer you resized to 80%.
Go to Select in the tool bar at the top of your screen.
Click it.
Now Click Inverse.
Hit the Delete key on your keyboard.
Go back to Select.
Click Deselect.
These are the elements I used on the header:
EL11
EL24
Duplicate and resize second layer to 80%.
EL30, resize to 75%
EL37, resize to 35%
EL36, resize to 35%
EL38, resize to 35%
EL2, resize to 50%
EL12, resize to 30%
EL3, resize to 35%
EL1
EL25, resize to 50%
Unhide your tube layer that you resized to 25%.
Bring that tube layer up in your Layer Palette
so that it's now on top of your last element layer.
Position as you like.
Open EL26.
Duplicate this layer.
Resize to 50%.
Duplicate this layer.
You will have 3 layers now.
Place where you like.
Open EL16.
Place on top of your frame layer.
Duplicate this layer.
Flip the second layer Horizontally.
Place these on the right and left sides of your header.
Place a drop shadow on all layers except:
frame layer (PP10)
PP5 layer
tube layer resized to 80%
EL26 layers
I also put an Outer Glow on EL30 layer.
Make a new layer.
Type whatever you would like your header to say.
I used color e0d89f.
These are the special effects I used on my text:
Drop Shadow
Outer Glow
Bevel & Emboss ~ the same settings as above
Stroke, 3, Outside, Black
MOST IMPORTANT!!
You must now do this:
Put the artist's name,
his/her website URL,
and your license number
of any tube you used on the siggy!!
Add your name (ie: Designed by Your Name)
somewhere on the header.
Make sure this info is legible and clearly seen.
Because this is a header,
you may need to use a larger font for this
than what you are normally used to.
It also helps to put an Outer Glow or Stroke
on this information text.
Save as PNG.
YOU'RE DONE!!
(If you want to maintain your layers
Always Save as PSD first.
Then you can save it as a PNG.)
YOU'RE DONE!
I hope you had fun with this tut!
♥HUGS!♥
*This tut was created by me, Redneck Tuts by Savage.
Any resemblance to any other is purely coincidental.*
Artist: ©Sweet-PinUp http://sweet-pinup.de/store SPU-22SavFB
Subscribe to:
Posts
(Atom)
About Me
- Savage
- Hi Ya'll! I'm Savage and I'd like to welcome you to Redneck Tuts. These are not your ordinary tuts, as they are geared toward those of us that don't have "working knowledge" of Photoshop or PSP. My tuts are all done in PS. They are designed to show you different techniques that you may not know. I hope you learn something that you can use in your creations in the future. Please, just have fun and put your own spin on these tuts. Be original and shine! Love Ya! ♥


