


♥ Follow Me ♥

♥Free Fonts♥


Sunday, May 13, 2012
SUPPLIES
NEEDED
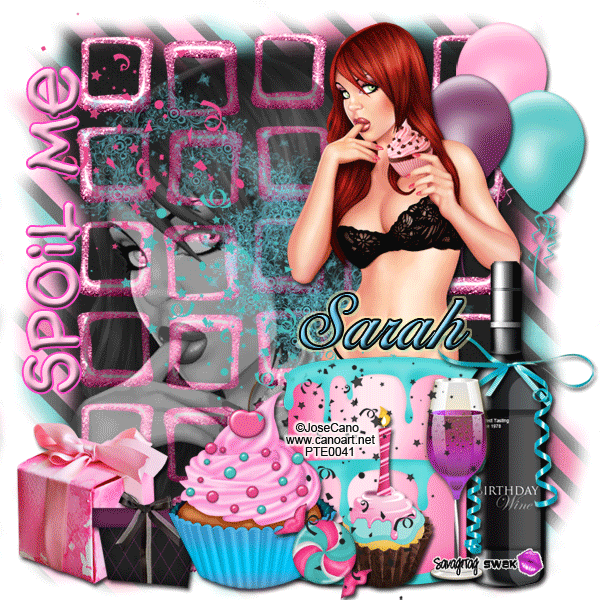
TUBE
OF CHOICE: I used the
awesome artwork of
Jose Cano.
This tube
came with a Close Up.
You must have
a license to use this art.
You
can find his tubes and get a license HERE.
SCRAPKIT:
Happy Birthday to Me by Designs by Sarah.
You
can find it HERE.
FONT
OF CHOICE: I used Cotillion for
the name.
WallowHmkBold
for Spoil Me.
I
used Photoshop for this tut.
♥♥♥♥♥♥♥
We'll
be making the background flash
and
the confetti move in this tut.
If
you don't wish to animate,
Skip
the parts in Blue.
Let's have
some fun!
Open
a new canvas, 700x700.
Flood
fill with color of choice.
I
used White.
Use
my taggie as a guide for placement of elements.
Open
pp5.
Go
to the upper right corner of your Layer Palette.
Set
the Opacity at 65%
Grab
a soft edged eraser.
Erase
around the edges.
Open
pp8.
Use
a soft edged eraser
to
erase around the edges.
Let
pp5 show around pp8.
Open
backdrop4.
Open
backdrop5.
Center
on canvas.
If
not animating, choose only one backdrop.
Open
your Close Up tube.
Place
to your liking.
Go
to the upper left corner of your Layer Palette.
Click
the down arrow next to the word Normal.
In
the drop down menu,
Click
Luminosity.
Set
Opacity at 65%.
Open
backdrop1.
Open
backdrop2.
If
you are not animating,
choose
only one backdrop.
Open
balloon2, 3 and 4.
Resize
all to 50%
Open
your regular sized tube.
Place
to your liking.
Open
cake1.
Resize
to 90%.
Place
in front of your tube.
These
are the other elements I used:
drink3,
resize to 65%
bow2,
resize to 60%
drink2,
resize to 50%
cupcake2,
resize to 50%
present1,
resize to 50%
present3,
resize to 40%
cupcake3,
resize to 50%
candy1,
resize to 25%
confetti
Place
a drop shadow on your layers.
I
did not place a drop shadow on:
paper
layers
backdrop
layers
Close
Up tube layer
confetti
Resize
your taggie to your liking.
Make a new
layer.
Type your
name.
I used color
6ec9f4.
Stroke:
Outside, 2, Black
Drop Shadow
Bevel & Emboss

Outer Glow
(color ffffbe)

Make another
new layer.
Type Spoil
Me.
I used color
fbbcd9.
Stroke:
Outside, 2, color fb4fc8.
Bevel & Emboss

MOST
IMPORTANT!!
You must now
do this:
Put the
artist's name, website, and your license number
of the tube
you used on the siggy!!
Add your name
(ie: Designed by Your Name) behind this info.
Make sure
this info is legible and clearly seen.
If
you are not animating:
Save
as PSD to maintain layers.
Then
save as PNG.
YOU'RE DONE!!
**TO
ANIMATE**
Hide these
layers in the Layer Palette:
backdrop3
backdrop2
Open
the Animation Window.
Set
the time for .2
Show
the rest of the layers in the first animation frame.
Click
the square button, next to the trash can,
in
the animation window.
This
will duplicate the first animation frame
and
make frame 2.
With
animation frame 2 highlighted,
Go
over to your Layer Palette.
Highlight
the confetti layer.
On
your canvas,
Move
the confetti down and to the right.
Go
back to the animation window.
Highlight
the first frame.
See
that icon that looks like a slanted row of squares?
Place
your cursor over it.
It
will say: Tweens Animation Frames.
Click
it.
A
new window pops up.
Use
these settings:

Now
you'll have ten frames of animation.
For
every even numbered frame:
Hide
these layers in your Layer Palette
backdrop4
backdrop1
Show:
backdrop3
backdrop2
For
your odd numbered frames:
Hide:
backdrop3
backdrop2
Show:
backdrop4
backdrop1
Click
Play.
If
you like what you see...
Save as
PSD. Then Save for Web & Devises.
I hope you
had fun with this tut!
♥HUGS!♥
*This tut was
created by me, Redneck Tuts by Savage.
Any
resemblance to any other is purely coincidental.*
Artist:
©Jose Cano www.canoart.net
PTE0041
Subscribe to:
Post Comments
(Atom)
About Me

- Savage
- Hi Ya'll! I'm Savage and I'd like to welcome you to Redneck Tuts. These are not your ordinary tuts, as they are geared toward those of us that don't have "working knowledge" of Photoshop or PSP. My tuts are all done in PS. They are designed to show you different techniques that you may not know. I hope you learn something that you can use in your creations in the future. Please, just have fun and put your own spin on these tuts. Be original and shine! Love Ya! ♥


0 comments:
Post a Comment