





♥ Follow Me ♥

♥Free Fonts♥


SUPPLIES NEEDED
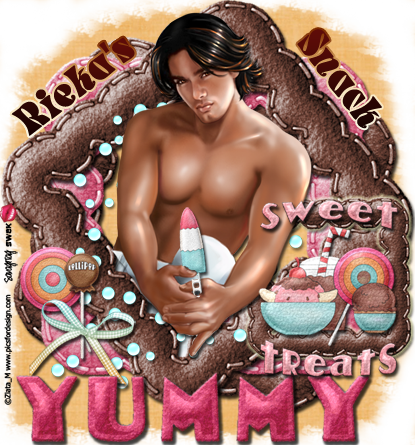
TUBE OF CHOICE: I used the fab artwork of Zlata_M.
You must purchase a license to use this art.
You can find Zlata's art and get your license HERE.
SCRAPKIT: Ice Cream Dream by Rieka Rafita.
This is a FTU kit. You can find it HERE.
FONT OF CHOICE: I used:
Spacearella
I used Photoshop for this tut.
♥♥♥♥♥♥♥
Let's have some fun!
Open a canvas, transparent background, 650x650 pixels.
Open RR_Paper10.
Center on canvas.
Open RR_Frame1.
Rotate and center on canvas.
Open RR_Frame2.
Rotate and place on top of Frame1.
Duplicate Frame1.
Move this layer on top of Frame2.
Rotate so you can see all frames.
Open your tube and place it under the top frame layer.
You may need to erase a little of the front frame
so your tube will show.
Open RR_IceCream4.
Resize and place in your tubes hands.
Again, you may need to erase a little
so it looks as though the tube is holding the ice cream.
Duplicate Frame1 again.
Resize down to 50%.
Move this layer under your tube.
Place this frame toward the lower right.
Open RR_SweetTreats.
Center this inside the small frame.
Open RR_Lolipop1
RR_Lolipop2
RR_Bow2.
Resize and place these over toward the left bottom.
Open RR_Wordart5.
Place at bottom of sig and center.
Open RR_Sprinkle2.
Place this under your tube and center.
Now make a new layer.
Type your name.
Type “Snack”.
I used stroke, 3 outside, with a gradient.
I also used a gradient for the color of these words.
Now highlight the Paper10 layer.
Grab a random eraser and erase around the edges.
MOST IMPORTANT!!
You must now do this:
Put the artist's name, website, and your license number
of the tube you used on the siggy!!
Add your name (ie: Designed by Your Name) behind this info.
Make sure this info is legible and clearly seen.
Save as PNG.
YOU'RE DONE!!
I hope you had fun with this tut!
HUGS!
*This tut was created by me, Redneck Tuts by Savage.
Any resemblance to any other is purely coincidental.*
Artist: ©Zlata_M www.picsfordesign.com PFD_Savage

SUPPLIES NEEDED
TUBE OF CHOICE: I used the fantastic artwork of Michael Calandra.
I used three different tubes.
You must purchase a license to use his art.
You can find Michael's art and get your license HERE.
SCRAPKIT: Gothic Valentines by Rieka Rafita.
This is a PTU kit. You can find it HERE.
FONT OF CHOICE:
I used VTKS SABONETE
I used Photoshop for this tut.
♥♥♥♥♥♥♥
Let's have some fun!
Open a canvas, transparent background, 650x650 pixels.
Open RR_Paper7.
Center on canvas.
Open RR_Frame1. Center.
Grab your magic wand and click inside the frame.
Highlight Paper7 layer.
Go to Select.
Click Inverse.
Hit the Delete key on your keyboard.
Go back to Select.
Click Deselect.
Open RR_Frame3.
Center over Frame1.
Open RR_SplashBlood.
Center inside frame.
Now for the accents.
I used these elements:
RR_ Bow2
RR_Bow1
RR_DiamondKey
RR_Bottle
RR_Cups
RR_Flower3
RR_BrokenHeart
RR_Wordart
RR_Skull
RR_SteampunkHeart1
RR_SteampunkHeart2
RR_SteampunkHeart3
RR_SteampunkHeart5
RR_Fog
I placed an Outerglow on all elements.
Open your tube of choice and place in center of siggy.
Now open your other two tubes.
Place them behind Frame1.
Position them so you can see them on each side of your main tube.
Highlight Frame1 layer.
Grab your magic wand and click inside the frame.
Highlight one of your two extra tubes.
Go to Select.
Click Inverse.
Hit the Delect key on your keyboard.
Back to Select.
Click Deselect.
Repeat this for your third tube.
Highlight on of your two tube layers.
Right click it.
A window will pop up.
Click Blending Options.
Select Luminosity 100%.
Repeat this for your other tube.
Now the only tube in full color will be the main tube.
Open RR_Sparkle2.
Place under your main tube.
Position where you like.
Make a new layer on top of all layers.
Type the name you want in the font you want.
I used Stroke, 2 center and an Outerglow.
MOST IMPORTANT!!
You must now do this:
Put the artist's name, website, and your license number
of the tube you used on the siggy!!
Add your name (ie: Designed by Your Name) behind this info.
Make sure this info is legible and clearly seen.
Save as PNG.
YOU'RE DONE!!
I hope you had fun with this tut!
HUGS!
*This tut was created by me, Redneck Tuts by Savage.
Any resemblance to any other is purely coincidental.*
Artist: ©Michael Calandra www.calandrastudio.com MPT1608

 This tut is for a forum set
SUPPLIES NEEDED
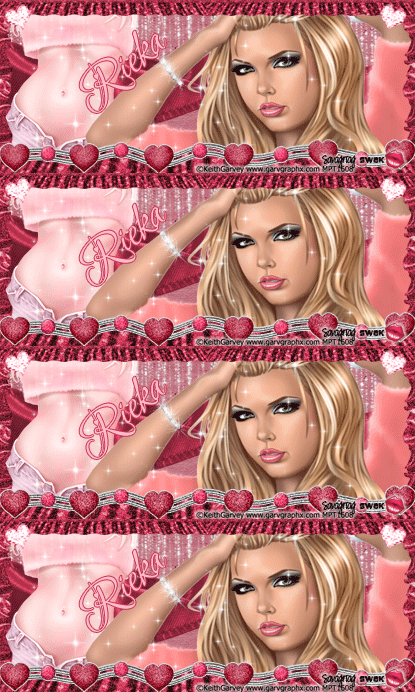
TUBE OF CHOICE: I used the fantastic artwork of Keith Garvey.
The tube I used came with a close up.
You must purchase a license to use his art.
You can find Keith's art and get your license HERE.
SCRAPKIT: Valentine of Twilight by Rieka Rafita.
This is a PTU kit. You can find it HERE.
FONT OF CHOICE: I used Love.
I used Photoshop for this tut.
♥♥♥♥♥♥♥
This tut is lengthy.
Remember we're making two things:
A banner and an avatar.
In this tut we'll be using Noise to create sparklies.
If you don't wish to animate, just skip the steps marked **BLUE**.
Let's start with making the banner.
Open a canvas, transparent background, 600x250 pixels.
Open RR_Paper12.
Size it to fit your canvas.
Open RR_Bling.
Place in center at top of canvas.
*Duplicate this layer twice.
You will now have three layers of Bling.
Click on your first Bling layer.
Go to Filter, Noise, Add Noise.
When the Noise window pops up
Type 20 in the box for Amount.
Check Uniform and Monochromatic.
Do the same for your next two layers of Icicles.
Second layer: 25 for Noise
Third layer: 30 for Noise.*
Open RR_Ribbon1.
Center it on canvas.
Now we'll create the frame using Ribbon1 and Ribbon5.
Open Ribbon5.
Resize in height to create top portion of frame.
Use my tag as a guide.
Make sure it reaches all the way from left to right.
Duplicate this layer.
Flip Horizontally.
Place this layer at bottom of canvas.
Now duplicate Ribbon1.
Flip 90 degrees clockwise.
Resize to fit between the top and bottom of the frame.
Place on the left side of canvas.
Duplicate this layer.
Flip Horizontally.
Place on right side of canvas.
Go to your last layer of the frame.
♥Highlight this layer.
Now right click.
You'll see a pop up window.
Click Merge Down.♥
Repeat this ♥ with the next two layers of your frame.
This will merge all four layers of frame.
You should now have your frame in one layer.
*Duplicate your frame layer twice.
You will now have three layers of your frame.
Click on your first frame layer.
Add Noise: 13
Second layer: 15
Third layer: 17*
Open your close up tube.
Position this behind your frame, over to the right.
Don't worry about anything on the outside of the canvas.
It won't show when you save it.
*To Animate the Bracelet:
Grab your magic wand.
Holding down the Shift key on your keyboard
Click on the bracelet until all of it is surrounded by 'marching ants.'
Go to Edit in your toolbar.
Click it.
A drop down menu will appear.
Click on Copy.
Go back to Edit.
Click on Paste.
This will create a new layer of your bracelet only.
You may want to label this layer 'Bracelet' in your layer pallet.
Duplicate this layer twice.
Now you will have three layers of bracelet.
Click on the first layer of bracelet.
Select White in your color pallet.
Over to the left, find the brush tool.
Click it.
In the top left of your tool bar
You'll see the word Brush.
See the little arrow next to Brush?
Click on that.
A window will pop up.
Search for a brush stroke that resembles a star.
Keep the Hardness at 100%.
Play with the Master Diameter to get the size you want.
You will be making little sparklies on the bracelet with this.
Now randomly click on the bracelet with the brush tool.
I put the star in four places on the bracelet.
Click on your second layer of the bracelet.
Place four random sparklies on it in different places than you first layer.
Do this again with your third layer of the bracelet.*
Open your other tube.
Position this behind your close up and frame.
Place this layer over to the left.
Again, no worries about anything outside the canvas.
Duplicate this layer.
Highlight your first tube layer.
Right click this layer in your layer pallet.
A window will pop up.
Go to Blending Options (second from top).
Use these settings:
Blending Mode: Luminosity
Opacity: 100%
Fill Opacity: 100%
Channels: Check R, G, B
Knockout: None
Check:
Blend Clipped Layers as Group
Transparency Shapes Layer
Blend If: Gray
This Layer: 255
Underlying Layer: 255
Highlight your second tube layer.
Right click.
Go to Blending Options.
Blend Mode: Screen
Set the rest as above.
Open RR_Sparkle3.
Position this on top of your bracelet layer.
(or on top of your close up layer if you are not animating.)
Move this layer around until you are happy with it.
Open RR_Crystal.
Resize to fit in corner of frame.
Duplicate this layer.
Place one layer in upper right corner,
One layer in upper left corner of frame.
Open RR_HeartBead.
Position this on top of your frame at bottom of canvas.
*Duplicate this layer twice.
You will now have three layers of HeartBead.
Click on your first HeartBead layer.
Add Noise: 15
Second layer: 20
Third layer: 25
Make a new layer.
Type your name.
I used ffbcca for color.
Stroke, outside, 2, c53452.
MOST IMPORTANT!!
You must now do this:
Put the artist's name, website, and your license number
of the tube you used on the siggy!!
Add your name (ie: Designed by Your Name) behind this info.
Make sure this info is legible and clearly seen.
If you don't want to animate, Save as PNG.
YOU'RE DONE!!
(If you want to maintain your layers
Always Save as PSD first.
Then you can save it as a PNG.
When doing both these steps
It is important to change the title of the tag.
Example:
When I Save as PSD,
I always name the tag what I want.
Then, when saving as a PNG,
I add the number 1 behind the name of the tag.
Like this:
I'm Yours, Save as PSD
I'm Yours1, Save as PNG
Otherwise, your PNG will overwrite your PSD
Merging your tag into one layer only.)
**TO ANIMATE**
Open the Animation Window.
You will need four frames.
Set the time for .1.
For the first frame:
Show only the first layers of:
Bling
Bracelet
Frame
HeartBead
Second frame:
Show only the second layers of these.
Third frame:
Show only the third layers of these.
Fourth frame:
Show the seconds layers only.
Save as PSD. Then Save for Web & Devises.
Now for the avatar!
Keep your banner window up.
Open a new canvas, 150x150, transparent background.
Make sure you can see both the banner and avatar windows.
We'll be using the drag and drop to create the avatar.
Click on your banner window.
Highlight RR_Paper12 layer.
Drag and drop it onto your avatar canvas.
No need to resize.
You won't be able to see anything outside your canvas when you save it.
Now click on your banner again.
Drag and drop your first (Luminosity) tube layer.
(Remember you didn't do anything to the tube for resizing
So when you drag and drop, you'll see her face.)
Position her face in your avatar.
Back to the banner.
Highlight your first frame layer.
Drag and drop onto your avatar canvas.
Resize to fit your canvas.
Use my avatar for a guide.
*Duplicate this layer twice.
Add Noise to second and third layers.
Second layer: 13
Third layer: 14*
Back on the banner
Drag and drop your first HeartBead layer.
Resize to fit avatar.
For the initial
I just drag and drop my name layer from the banner.
It's still in Text form.
Click on your Text tool.
Delete all letters except for the first one.
Resize this to fit.
MOST IMPORTANT!!
For avatars:
Make a new layer.
Type the artist's name and your license number.
Like this:
©Keith Garvey MPT****
On avatars, you don't need the artist's website.
Just the name and your license number.
Make sure it is legible and clearly seen.
I normally put an Outerglow on it.
If you don't want to animate, Save as PNG.
YOU'RE DONE!!
**TO ANIMATE**
Open the Animation Window.
You will need four frames.
Set the time for .1.
For the first frame of animation:
Show only the first Frame layer.
Second frame:
Show only the second layer.
Third frame:
Show only the third layer.
Fourth frame:
Show the seconds layer only.
Save as PSD. Then Save for Web & Devises.
YOU'RE DONE!
I hope you had fun with this tut!
HUGS!
*This tut was created by me, Redneck Tuts by Savage.
Any resemblance to any other is purely coincidental.*
Artist: ©Keith Garvey www.garvgraphx.com MPT1608
About Me
- Savage
- Hi Ya'll! I'm Savage and I'd like to welcome you to Redneck Tuts. These are not your ordinary tuts, as they are geared toward those of us that don't have "working knowledge" of Photoshop or PSP. My tuts are all done in PS. They are designed to show you different techniques that you may not know. I hope you learn something that you can use in your creations in the future. Please, just have fun and put your own spin on these tuts. Be original and shine! Love Ya! ♥


