





♥ Follow Me ♥

♥Free Fonts♥


Monday, September 5, 2011

SUPPLIES NEEDED
TUBE OF CHOICE: I used the fantastic artwork of Alfadesire.
You must have a license to use this art.
You can find this art and get your license HERE.
SCRAPKIT: Rainbow Bright by Grunge and Glitter.
You can find it HERE.
FONT OF CHOICE: I used:
Name: The Blue Cabin
Wordart: That's It!
I used Photoshop for this tut.
♥♥♥♥♥♥♥
In this tut we'll make hearts fall.
We'll also learn how to make things spin.
If you don't wish to animate, just skip the steps marked *BLUE*
Use my tag as a guide for placement of elements.
Open a canvas 700x700 pixels.
Flood fill with the color of your choice.
Open tagback1.
Resize to 85%.
Center on canvas.
Open clusterframe1.
Center on canvas.
*Duplicate this layer 7 times.
You should now have eight layers.
Hide all layers except 1 & 2.
Leave first layer as is.
Highlight second layer.
Right click on the frame on the canvas.
In the new window, choose Rotate.
Rotate the frame a little clock wise.
I use the flowers as a guide for rotating.
Just rotate the frame so the flowers move a bit up.
Use layer one for a guide for rotating.
That way, you can see how much you have rotated.
Go to the toolbar on the left side of your screen.
Click the arrow (move tool).
When a window comes up,
Click Apply.
Repeat the rotating steps for the rest of the layers.
I hide all the layers except the one I'm working on
and the one directly beneath it.
That way, I can see the progress of rotation.*
Open elementcluster2.
Resize to 70%.
Flip Horizontally.
Open your tube.
Center on canvas.
Open heartscatter1.
Place on right side of tag.
Open halftone2.
Resize to 35%.
I used a Stroke on this.
These are the settings I used.
Color: f2fa0d

Click Ok.
Place a drop shadow on all layers
except the halftone and tagback layers.
Resize your siggy to your liking.
Make three new layers.
We're going to do the wordart now.
I used one layer for each word
so I could position them where I wanted.
Using the font of your choice
Type:
I, the, BUNNY
all on their own layer.
Color: fafb03
Stroke: Outside, 3, Black
Outer Glow:
Click Ok.
Make another new layer.
Type your name on the taggie.
I used the same colors and settings
as the wordart.
MOST IMPORTANT!!
You must now do this:
Put the artist's name, website, and your license number
of the tube you used on the siggy!!
Add your name (ie: Designed by Your Name) behind this info.
Make sure this info is legible and clearly seen.
If you don't want to animate, Save as PNG.
YOU'RE DONE!!
(If you want to maintain your layers
Always Save as PSD first.
Then you can save it as a PNG.
When doing both these steps
It is important to change the title of the tag.
Example:
When I Save as PSD,
I always name the tag what I want.
Then, when saving as a PNG,
I add the number 1 behind the name of the tag.
Like this:
Kiss Me Hard, Save as PSD
Kiss Me Hard1, Save as PNG
Otherwise, your PNG will overwrite your PSD
Merging your tag into one layer only.)
**TO ANIMATE**
Hide all your duplicated clusterframe1 layers
except the first one
in the Layer Palette.
(Should be seven layers that are duplicated.)
Open the Animation Window.
Set the time for .2.
Show all visible layers in the first frame.
Click the square button, next to the trash can,
in the animation window.
This will duplicate the first animation frame.
Go over to your Layer Palette.
Highlight your heartscatter1 layer.
Go over to the canvas and move this down.
Place this where you want your falling hearts to end.
Now go back to your animation window.
Highlight frame 1.
See that icon that looks like a slanted row of squares?
Place your cursor over it.
It will say: Tweens Animation Frames.
Click it.
A new window pops up.
Use these settings:

Click OK.
Now you'll have eight frames of animation.
Go ahead and click Play
to see your falling hearts.
Ok.
Now back to animating the rest of the siggy.
Go to the second animation frame in the animation window.
Highlight it.
Now go to your Layer Palette.
Hide all clusterframe1 layers
except the second one.
Back to animation window.
Highlight the third animation frame.
Hide all clusterframe1 layers in the Layer Palette
except 3rd layer.
Back to animation window.
Highlight frame four.
Hide all clusterframe1 layers in the Layer Palette
except 4th layer.
Back to animation window.
Highlight frame five
Hide all clusterframe1 layers in the Layer Palette
except 5th layer.
Back to animation window.
Highlight frame six.
Hide all clusterframe1 layers in the Layer Palette
except 6th layer.
Back to animation window.
Highlight frame seven.
Hide all clusterframe1 layers in the Layer Palette
except 7th layer.
Back to animation window.
Highlight frame eight.
Hide all clusterframe1 layers in the Layer Palette
except 8th layer.
Click Play.
If you like what you see...
Save as PSD. Then Save for Web & Devises.
YOU'RE DONE!
I hope you had fun with this tut
and that you can use the fading technique
in other taggies you create!
HUGS!
*This tut was created by me, Redneck Tuts by Savage.
Any resemblance to any other is purely coincidental.*
Artist: ©Alfadesire www.picsfordesign.com PFD_Savage
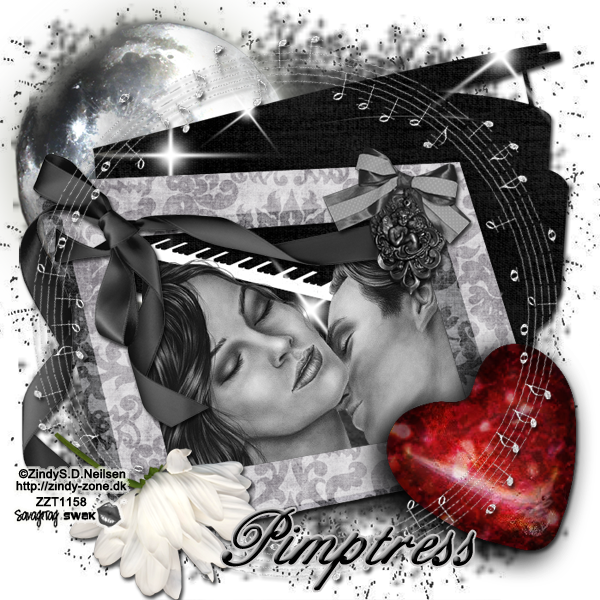
SUPPLIES NEEDED
TUBE OF CHOICE: I used the awesome artwork of
Zindy S.D. Neilsen.
You must have a license to use her art.
You can find Zindy's art
and get a license HERE.
SCRAPKIT: Midnight Lullabye
by Pimp'd Designz
You can find it HERE.
MASK: Mask8 by Savage SWAK.
You can snag it HERE.
FONT OF CHOICE: I used Bix Antique Script Hmk
I used Photoshop for this tut.
♥♥♥♥♥♥♥
Let's have some fun!
Open a new canvas, 700x700.
Transparent background.
Use my taggie as a guide for placement of elements.
Open paper8.
Center on canvas.
Open Mask8.
You'll see three layers in Mask8.
Only move the layer called Mask
onto your siggy.
Place this on top of your paper.
With this layer highlighted
hold your CTRL key down on your keyboard
and hit your mask icon in the layer palette
at the same time.
You'll see little marching ants now.
Highlight your paper layer.
Click the mask button
(this is a square with a circle in it)
at the bottom of the layer palette.
*You should have two pictures in your paper layer now.
One of your paper and one of the mask.*
Hide your mask layer.
Highlight the paper layer.
Right click in the layer palette.
Hit Convert to Smart Object.
Right click again.
Click Rasterize Layer.
Now you can delete the gray mask layer.
Resize your new mask to your liking.
I used these elements:
Use my tag as a guide for placement.
moon
piano
sparkle, resize to 80%
frame07
Open your tube.
Place behind frame.
Position where you like.
Highligh frame07 layer.
Grab your magic wand.
Click inside the frame.
Highlight your tube layer.
Go to the toolbar at the top of your screen.
Click Select.
In the drop down meun,
Choose Inverse.
Now hit the Delete key on your keyboard.
Go back to Select.
Click Deselect.
I placed these elements on top of my tube:
ribbon01, resize to 50%
charmed, resize to 40%
heart
circle glitter note, resize to 80%
flower04, resize to 40%
Place a drop shadow on your layers.
I did not place a drop shadow on:
paper/mask layer
moon
sparkle
tube layer
Resize your taggie to your liking.
Make a new layer.
Type your name.
I used Black.
Stroke, Outside, 2, color cac8c8
I also Bevel and Emboss.
For Bevel & Emboss:

Click Ok.
MOST IMPORTANT!!
You must now do this:
Put the artist's name, website, and your license number
of the tube you used on the siggy!!
Add your name (ie: Designed by Your Name) behind this info.
Make sure this info is legible and clearly seen.
Save as PSD to maintain layers.
Then save as PNG, remembering to use a number behind your sig title.
YOU'RE DONE!!
I hope you had fun with this tut!
♥HUGS!♥
*This tut was created by me, Redneck Tuts by Savage.
Any resemblance to any other is purely coincidental.*
Artist: ©Zindy S.D. Neilsen http://zindy-zone.dk ZZT1158

SUPPLIES NEEDED
TUBE OF CHOICE: I used the awesome artwork of
Ismael Rac.
You must have a license to use his art.
You can find Ismael's art
and get a license HERE.
SCRAPKIT: Valentine Chocolates - tagger
by PolkaDot Scraps
You can find it HERE.
MASK: Mask1 by Savage SWAK.
You can snag it HERE.
FONT OF CHOICE: I used:
Name: ChopinScript
CHOCOLATE: Pasion Acustica
Indulgence: ChopinScript
I used Photoshop for this tut.
♥♥♥♥♥♥♥
Let's have some fun!
Open a new canvas, 700x700.
Transparent background.
Use my taggie as a guide for placement of elements.
Open paper1.
Resize to 90%.
Center on canvas.
Open Mask1.
You'll see three layers in Mask1.
Only move the layer called Mask
onto your siggy.
Place this on top of your paper.
With this layer highlighted
hold your CTRL key down on your keyboard
and hit your mask icon in the layer palette
at the same time.
You'll see little marching ants now.
Highlight your paper layer.
Click the mask button
(this is a square with a circle in it)
at the bottom of the layer palette.
*You should have two pictures in your paper layer now.
One of your paper and one of the mask.*
Hide your mask layer.
Highlight the paper layer.
Right click in the layer palette.
Hit Convert to Smart Object.
Right click again.
Click Rasterize Layer.
Now you can delete the gray mask layer.
Resize your new mask to your liking.
I used these elements:
Use my tag as a guide for placement.
element27
frame4
frame5
element3
element2
element4
element35, resize to 90%
Open your tube.
Position where you like.
I placed these elements on top of my tube:
element21, flip Horizontally
element25, resize to 35%
Duplicate this layer.
Flip Horizontally.
element9, resize to 35%
element8, resize to 35%
Duplicate this layer.
Flip Horizontally.
element19, resize to 90%
element13, resize to 75%
element16, resize to 90%
element6
element1
Place a drop shadow on your layers.
I did not place a drop shadow on:
elements 1 & 6
frame4
element27
paper/mask layer
Resize your taggie to your liking.
Make a new layer.
Type your name.
I used color 7a5345.
(I used this color for all the text in the siggy.)
Stroke, Outside, 2, color f99ac5
I also used:
Bevel and Emboss
Outer Glow
Drop Shadow
For Bevel & Emboss:

Click Ok.
Outer Glow:

Click Ok.
Drop Shadow:

Click Ok.
Make a new layer.
Type the word Chocolate.
I used Stroke, Outside, 3, color ac0823.
And I used the same effects
and settings from above.
Bevel & Emboss
Outer Glow
Drop Shadow.
Make another new layer.
Type Indulgance.
All effects are the same as your name layer,
including Stroke.
MOST IMPORTANT!!
You must now do this:
Put the artist's name, website, and your license number
of the tube you used on the siggy!!
Add your name (ie: Designed by Your Name) behind this info.
Make sure this info is legible and clearly seen.
Save as PSD to maintain layers.
Then save as PNG, remembering to use a number behind your sig title.
YOU'RE DONE!!
I hope you had fun with this tut!
♥HUGS!♥
*This tut was created by me, Redneck Tuts by Savage.
Any resemblance to any other is purely coincidental.*
Artist: ©Ismael Rac www.xeracx.net IRS344B
Subscribe to:
Posts
(Atom)
About Me
- Savage
- Hi Ya'll! I'm Savage and I'd like to welcome you to Redneck Tuts. These are not your ordinary tuts, as they are geared toward those of us that don't have "working knowledge" of Photoshop or PSP. My tuts are all done in PS. They are designed to show you different techniques that you may not know. I hope you learn something that you can use in your creations in the future. Please, just have fun and put your own spin on these tuts. Be original and shine! Love Ya! ♥


